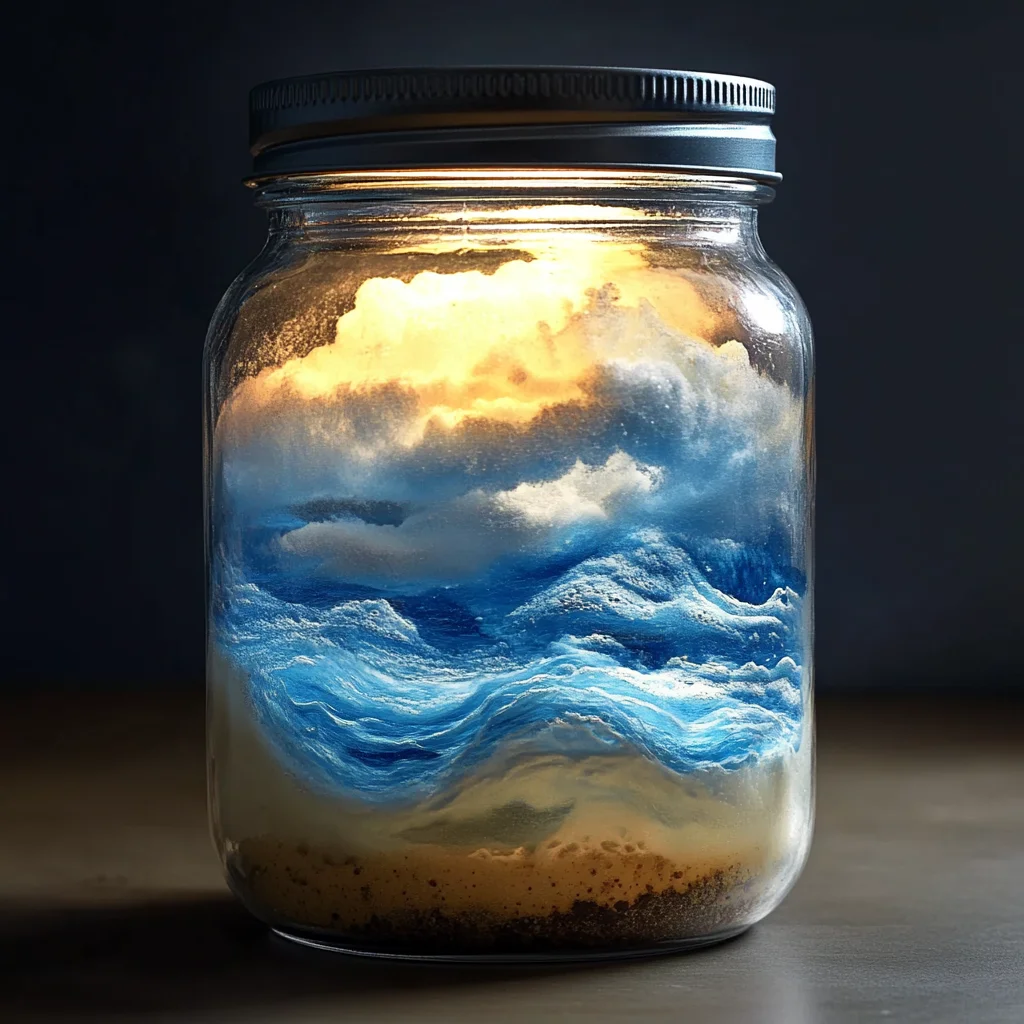
Remember those childhood moments when a simple craft or science experiment could captivate your imagination for hours? There’s something truly magical about watching tiny droplets swirl and dance, mimicking the wild beauty of a storm—all contained safely in a jar on your kitchen table. That’s exactly what the “Storm in a Jar” recipe brings to life. Whether you’re looking for a fun activity to entertain the kids, a thoughtful handmade gift, or just a cozy way to add a little wonder to your day, this project is fast, simple, and endlessly fascinating.
This recipe requires just a handful of common ingredients, no fancy tools, and less than 10 minutes of your time. Plus, it’s a fantastic conversation starter and a whimsical reminder of nature’s beauty. As someone who loves turning everyday moments into little celebrations, I can tell you this is one of those projects that never gets old. Let me walk you through how to create your very own storm in a jar, and I’ll share some tips to make it even more special.
Why You’ll Love Storm in a Jar
- Fast: You can whip this up in less than 10 minutes, perfect for a last-minute craft or science demo.
- Easy: No complicated ingredients or techniques—just simple household items.
- Giftable: Makes a charming, handmade present that’s both fun and unique.
- Crowd-pleasing: Kids and adults alike love watching the swirling “storm” come alive.
Ingredients
Gathering your ingredients is probably the easiest part of this recipe. Here’s what you’ll need and why each item matters:
- Water: The base of your little storm—water helps create the raindrops effect.
- Vegetable oil: This sits on top of the water, creating a clear “sky” layer and making the water droplets move slowly, mimicking rain.
- Blue food coloring: Just a few drops will give the water a soothing ocean-blue color, adding to the stormy atmosphere.
- Glitter (optional): For a touch of sparkle—think of it as lightning or rain shimmering in the light.
- Small piece of cotton or sponge: This acts as the “clouds” that rest on top of the oil layer.
I love using cotton balls for the cloud because they’re soft and fluffy, but a small piece of sponge does the trick just as well. Plus, both are easy to find around the house.
How to Make Storm in a Jar
Now for the fun part! Follow these simple steps, and before you know it, your storm will be swirling right before your eyes:
- Fill your jar halfway with water. I like to use a clear glass jar—something you can see through easily, like a mason jar or a recycled jam jar. The clearer, the better for watching the storm unfold.
- Pour vegetable oil into the jar until it’s nearly full, leaving some space at the top. The oil will float on top of the water, creating two distinct layers that won’t mix easily. This separation is key for the storm effect.
- Add a few drops of blue food coloring to the water layer. Don’t worry if it doesn’t blend immediately. You’ll see the color gently swirl and spread when you shake the jar.
- Sprinkle in glitter if you want that extra sparkle. I always add glitter when making this with kids—it’s like magic dust that makes the storm come alive.
- Place a small piece of cotton or sponge on top of the oil layer. This represents the clouds hanging overhead. Make sure it floats and covers the surface without sinking.
- Seal the jar with the lid and shake gently to mix the contents. You’ll see the blue water droplets start to fall through the oil just like rain drops falling from clouds.
- For an extra cool effect, shine a small flashlight through the jar in a dark room. This highlights the swirling droplets and glitter, making the storm look even more realistic and mesmerizing.
It’s such a simple process, but the result is truly enchanting. I often find myself mesmerized by the delicate dance of the droplets, and it’s a perfect little break from the busy day.
Substitutions & Additions
Want to switch things up or customize your storm? Here are some easy swaps and upgrades you might enjoy:
- Use baby oil instead of vegetable oil for a slightly different texture and scent.
- Try different food coloring shades, like purple or green, for a fantasy storm effect or a festive holiday vibe.
- Add small plastic or foam shapes, like tiny lightning bolts or raindrops, for more visual interest.
- Use different jars or bottles— a clear vase or plastic bottle works well and changes the shape of your storm.
- For a scented version, add a drop of essential oil (like eucalyptus or lavender) to the oil layer for a calming aroma.
If you love projects that combine creativity and science, you might also enjoy trying the French Onion Soup Pasta recipe on WhizTips for a comforting twist on classic flavors.
Tips for Success
To get the best results and avoid common pitfalls, here are some helpful pointers I’ve learned over time:
- Use room temperature water. Cold water can cause the oil to thicken and slow the movement of droplets.
- Don’t overfill the jar. Leave some space at the top so you can shake it without spilling.
- Shake gently. Vigorous shaking can mix the layers too much and reduce the storm effect temporarily.
- Prepare your cotton clouds carefully. Make sure the cotton or sponge isn’t soaked with water or oil; it should just float on top.
- Try this activity as a calming sensory tool. Watching the storm settle can be soothing, especially for kids or during a hectic day.
- Prep ahead by mixing the water and food coloring first. This can save you a step when you’re ready to assemble the jar.
By following these tips, you’ll create a beautifully swirling storm that’s both mesmerizing and long-lasting. If you enjoy these hands-on projects, be sure to check out the Blueberry Swirl Yogurt Bites on WhizTips for a delicious and fun treat to make alongside your storm jar experiment.
How to Store Storm in a Jar
Once you’ve created your storm, you might wonder how long it will last and how to keep it looking fresh. Here’s what you need to know:
- Keep the jar tightly sealed. This prevents spills, evaporation, and contamination.
- Store at room temperature. Extreme heat or cold can affect the oil and water layers’ separation.
- Shake gently before each viewing. This refreshes the storm effect and keeps the droplets moving.
- Use within a few weeks. Over time, the oil and water may start to mix or the food coloring may fade.
If the glitter settles at the bottom, just give the jar a gentle swirl to bring back the sparkle. I sometimes keep my storm jar on a windowsill where the light catches the glitter and water droplets beautifully throughout the day.
FAQs
Q: Can I use other types of oil besides vegetable oil?
A: Yes! Baby oil or mineral oil can work as well, though vegetable oil is most common because it’s affordable and easy to find.
Q: Is it safe for kids to make and play with?
A: Absolutely. Just supervise younger children to make sure the jar stays sealed and isn’t opened or spilled.
Q: Can I reuse the storm in a jar?
A: Yes, you can shake and enjoy the storm multiple times. Just keep it sealed and stored properly between uses.
Q: What if the layers mix and don’t separate?
A: This usually happens if the jar is shaken too hard or if the oil and water are not used properly. Let the jar sit undisturbed for a while, and the layers should separate again.
For more creative and comforting recipes, you might want to explore the Easy Flavorful Chicken Ramen on WhizTips—perfect for cozy nights in after making your storm jar.
Thanks for stopping by and sharing this little moment of magic with me. If you try out the Storm in a Jar, I’d love to hear how it turns out! And if you’re always looking for fresh inspiration, don’t miss the incredible collection of recipes and tips waiting for you at WhizTips.
For even more crafty kitchen ideas and delicious recipes, be sure to follow my Pinterest board where I pin all my favorite finds and creations!
Storm in a Jar
Ingredients
Equipment
Method
- Step 1: Fill your jar halfway with room temperature water.
- Step 2: Pour vegetable oil into the jar until it’s nearly full, leaving some space at the top.
- Step 3: Add a few drops of blue food coloring to the water layer. It may not blend immediately.
- Step 4: Sprinkle in glitter if desired for extra sparkle.
- Step 5: Place a small piece of cotton or sponge on top of the oil layer to represent clouds.
- Step 6: Seal the jar with the lid and shake gently to mix the contents and watch the storm form.
- Step 7: For extra effect, shine a flashlight through the jar in a dark room to highlight swirling droplets and glitter.