There’s something truly comforting about a no bake peanut butter pie that takes me right back to cozy family gatherings and carefree summer afternoons. If you’re anything like me, you probably cherish those moments when dessert feels like a warm hug—rich, creamy, and just a little bit nostalgic. The best part? This pie comes together quickly, without turning on the oven, which means you get more time to relax and less time stuck in the kitchen.
This No Bake Peanut Butter Pie is one of those magical recipes that’s as simple as it is unforgettable. Whether you’re whipping it up for a last-minute get-together, a holiday treat, or just because you need a little peanut butter magic in your life, this pie won’t disappoint. Let me walk you through everything you need to know to make this crowd-pleaser your new go-to dessert.
Why You’ll Love No Bake Peanut Butter Pie
- Fast: No baking means you can have dessert ready in under 10 minutes.
- Easy: Just a few ingredients and simple steps—perfect for beginner bakers or busy days.
- Giftable: This pie makes a sweet homemade gift that everyone will adore.
- Crowd-pleasing: Peanut butter lovers and dessert fans alike will be asking for seconds.
Ingredients
Before you get started, gather these simple ingredients. Each one plays a crucial role in building the perfect balance of creamy, sweet, and slightly salty peanut butter bliss.
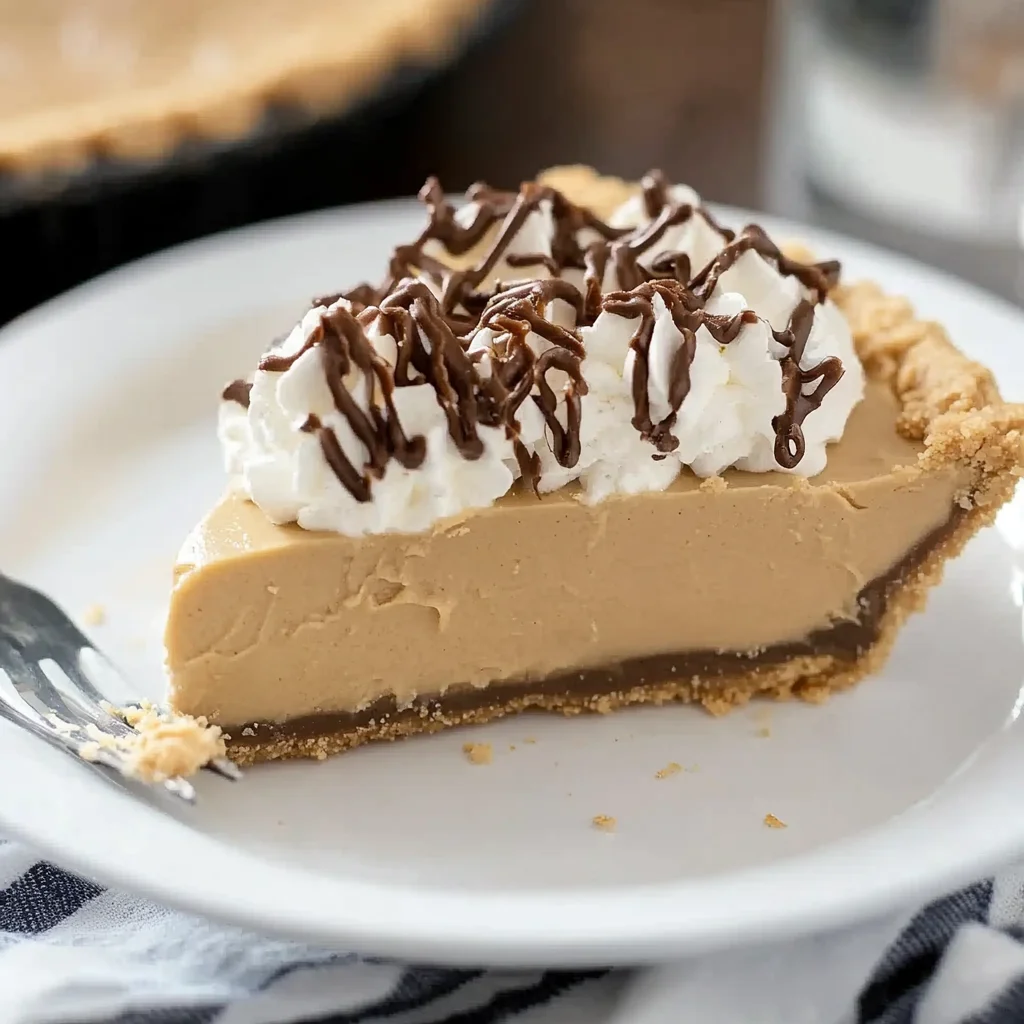
- 1 chocolate graham cracker crust: This provides a rich, chocolatey base that pairs perfectly with the peanut butter filling. You can find pre-made crusts at most grocery stores, or make your own if you’re feeling adventurous.
- 8 ounces cream cheese, at room temperature: Softened cream cheese gives the pie a luscious, velvety texture and a slight tang that balances the sweetness.
- ½ cup sugar: Just enough sweetness to enhance the peanut butter without overpowering it.
- 1 cup creamy peanut butter: The star of the show! Creamy peanut butter blends smoothly, but you could use chunky if you prefer a little crunch.
- 1 teaspoon vanilla extract: Adds warmth and depth to the pie’s flavor.
- 8 ounces frozen whipped topping, thawed: This lightens the filling and keeps it airy and soft.
- Whipped cream, for serving (optional): A pretty finishing touch that adds an extra layer of indulgence.
How to Make No Bake Peanut Butter Pie
Making this pie is as relaxing as enjoying it. Here’s how you can bring all these ingredients together into a luscious dessert everyone will love:
- Beat the cream cheese and sugar: In a large mixing bowl, start by beating the cream cheese and sugar until the mixture is smooth and creamy. I like to use an electric mixer for this step, but a sturdy whisk works if you don’t have one handy. This base needs to be perfectly smooth for the best texture.
- Add peanut butter and vanilla: Next, mix in the peanut butter and vanilla extract. Beat until everything is fully combined and the mixture is silky. If your peanut butter is a bit stiff, warming it slightly in the microwave can help it blend better without heating the entire mixture.
- Fold in the whipped topping: Now, gently fold the thawed whipped topping into the peanut butter mixture. Folding is key here—you want to keep as much air in the filling as possible for that light, fluffy texture. Use a spatula and fold in large, gentle strokes.
- Spread into the crust: Evenly spread the filling over the chocolate graham cracker crust. I like to use the back of a spoon or an offset spatula to smooth the top for a nice finish.
- Refrigerate to set: Pop the pie in the fridge for at least 4 hours. This step is important because it allows the filling to firm up and flavors to meld together beautifully. If you’re in a hurry, you can chill it for 2 hours, but I promise it tastes best when fully set.
- Serve and enjoy: When you’re ready, slice the pie and serve with a dollop of whipped cream if you like. It’s perfect on its own, but that extra touch is always a crowd favorite!
Substitutions & Additions
One of the best things about this pie is how easily you can customize it to suit your taste or dietary needs. Here are some fun swaps and creative additions to make this recipe your own:
- Crust alternatives: Instead of a chocolate graham cracker crust, try a regular graham cracker crust, Oreo crust, or even a nut-based crust for extra crunch.
- Nut butters: If peanut butter isn’t your thing, almond butter or cashew butter can work beautifully. Just make sure they’re smooth and creamy for the best texture.
- Sweeteners: Swap out the sugar for honey, maple syrup, or a sugar substitute if you want a different kind of sweetness or a lower glycemic index.
- Chocolate lovers: Add mini chocolate chips to the filling or sprinkle cocoa nibs on top for a little texture and extra chocolate kick.
- Crunch factor: Stir in some chopped peanuts or toffee bits for a delightful surprise in every bite.
- Flavor boosts: A pinch of cinnamon or a dash of espresso powder mixed into the filling can deepen the flavor wonderfully.
Tips for Success
Having made this pie a dozen times, I’ve learned a few tricks that make all the difference between a good pie and a great one:
- Room temperature cream cheese: This is key for a smooth, lump-free filling. If your cream cheese is cold, give it a quick zap in the microwave for 15 seconds or leave it out for an hour before starting.
- Don’t rush the chilling: The pie needs time to set properly. If you skip or shorten the refrigeration time, the filling will be too soft and might not slice nicely.
- Gentle folding: When adding the whipped topping, fold gently to keep the airy texture intact. Overmixing will deflate your filling.
- Make ahead: This pie is fantastic when made a day in advance. It actually tastes better after the flavors have had time to mingle overnight.
- Serving tip: If your pie feels too firm when you first take it out of the fridge, let it sit at room temperature for 10-15 minutes before slicing. This makes cutting easier and cleaner.
How to Store No Bake Peanut Butter Pie
Storing this pie properly ensures it stays fresh and delicious for as long as possible. Because it’s made with dairy and whipped topping, refrigeration is a must.
- Refrigerator: Cover the pie tightly with plastic wrap or store it in an airtight container. It will keep well for up to 4 days. Beyond that, the crust may start to soften and the filling’s texture can change.
- Freezing: You can freeze this pie for up to 1 month. Wrap it well in plastic wrap and then aluminum foil to prevent freezer burn. Thaw overnight in the refrigerator before serving. Note that the texture might be slightly different after freezing, but it’s still delicious!
- Transporting: If you’re taking this pie to a party or potluck, keep it chilled in a cooler until serving time to maintain that perfect creamy texture.
FAQs
Can I use crunchy peanut butter instead of creamy?
Absolutely! Crunchy peanut butter will add a nice texture contrast to the smooth filling. Just make sure it’s well mixed so the pie sets evenly.
What if I don’t have a chocolate graham cracker crust?
No worries! A regular graham cracker crust or even a store-bought Oreo crust will work beautifully. You can also make your own crust by crushing cookies and mixing with melted butter.
Can I make this pie vegan or dairy-free?
Yes, with a few swaps! Use dairy-free cream cheese and whipped topping alternatives, and make sure your crust is vegan-friendly. Peanut butter is naturally vegan, so that part stays the same.
How do I prevent the pie from being too sweet?
To keep the sweetness balanced, use natural peanut butter (without added sugar) and adjust the sugar amount in the filling. You can start with less sugar and add more if needed.
Now that you’ve got the perfect no bake peanut butter pie recipe in your hands, why not explore some other comforting flavors? If you love easy, cozy meals, you might really enjoy the creamy ground beef potato casserole or the French onion soup pasta comfort food twist. Both are perfect dishes to warm you up on a chilly evening and just as straightforward to make as this pie.
And if you’re in the mood for some sweet treats, don’t miss out on the easy s’more bars with chocolate and graham, which are a fantastic no-bake dessert to share with friends or family.
Happy baking (or rather, no baking!), and I hope your kitchen fills with the irresistible aroma of peanut butter and chocolate soon!
For more amazing recipes and kitchen tips, be sure to follow us on Pinterest for daily inspiration and drool-worthy ideas.
No Bake Peanut Butter Pie
Ingredients
Equipment
Method
- Step 1: Beat the cream cheese and sugar in a large mixing bowl until smooth and creamy using an electric mixer or whisk.
- Step 2: Add peanut butter and vanilla extract to the cream cheese mixture and beat until fully combined and silky.
- Step 3: Gently fold the thawed whipped topping into the peanut butter mixture using a spatula to maintain a light, fluffy texture.
- Step 4: Evenly spread the filling over the chocolate graham cracker crust and smooth the top with a spoon or offset spatula.
- Step 5: Refrigerate the pie for at least 4 hours to set and allow flavors to meld. For best results, chill overnight.
- Step 6: Slice and serve with whipped cream if desired. Let pie sit at room temperature 10-15 minutes before slicing if too firm.