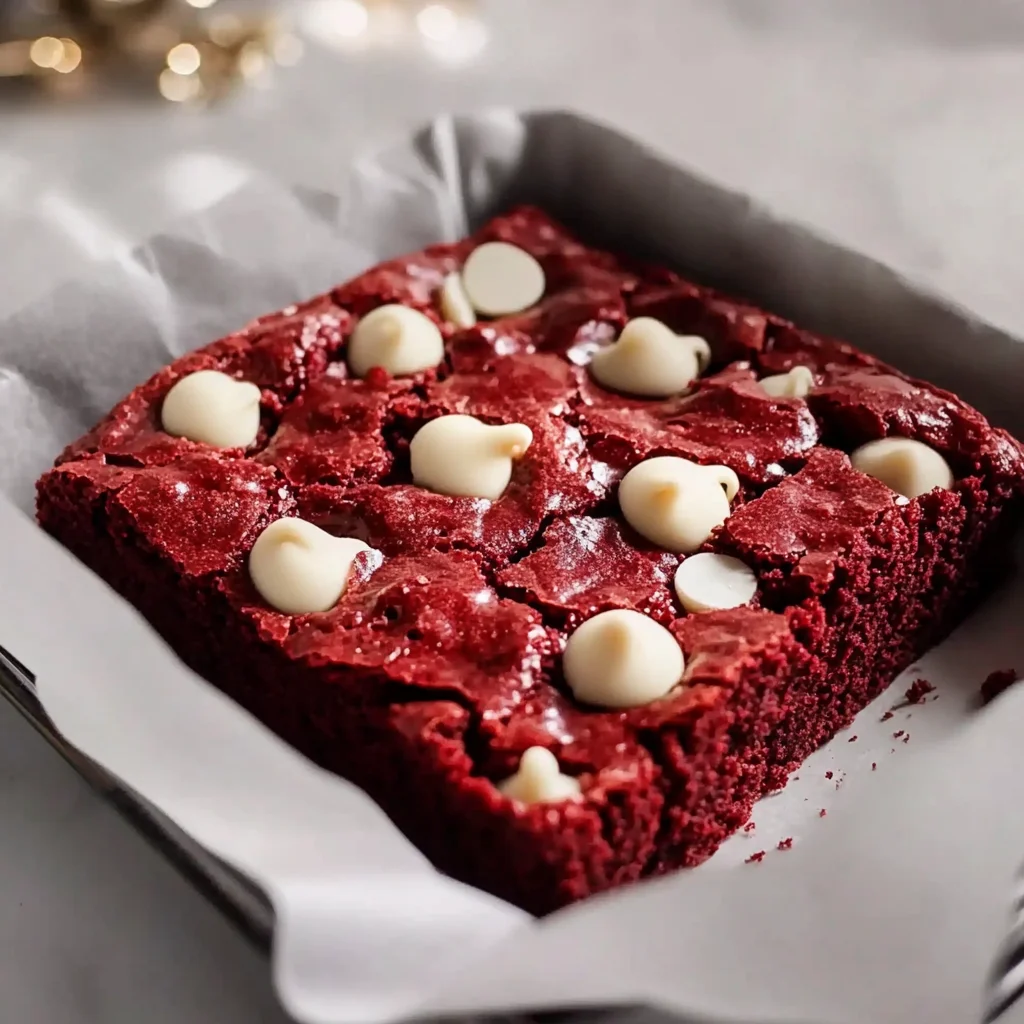
There’s something wonderfully nostalgic about the rich, velvety texture and vibrant red color of red velvet desserts. I still remember the first time I baked red velvet cake—how the deep red batter promised something special, and the sweet, creamy frosting was like a little hug for my taste buds. Now, imagine all those lovely flavors packed into a fudgy, brownie-like treat with bursts of creamy white chocolate chips. That’s exactly what these Red Velvet Brownies with White Chocolate Chips are all about. They’re quick to whip up, super easy to bake, and perfect for cozy nights at home or sharing with friends and family.
This recipe beautifully blends the classic red velvet cake mix with the rich indulgence of brownies, giving you a soft, moist, and slightly chewy texture that’s just perfect. The white chocolate chips add a lovely, sweet surprise in every bite, making these brownies an unforgettable dessert. Whether you’re new to baking or a seasoned pro looking for a simple yet crowd-pleasing treat, these brownies will quickly become a go-to in your recipe collection.
Why You’ll Love Red Velvet Brownies with White Chocolate Chips
- Fast: From start to finish, these brownies come together in under 30 minutes, making them perfect for last-minute cravings or unexpected guests.
- Easy: Using a boxed cake mix means you don’t have to fuss with measuring out individual ingredients—just mix and bake!
- Giftable: Their stunning red color and delightful flavor make these brownies a fantastic homemade gift for holidays, birthdays, or just because.
- Crowd-pleasing: Whether it’s a family gathering or a potluck, everyone will be asking for the recipe. They’re rich yet light, and the white chocolate chips add a creamy balance that’s hard to resist.
Ingredients
Let’s talk about the simple ingredients you’ll need to make these delightful brownies. Each one plays an important role in creating the perfect texture and flavor:
- 1 box red velvet cake mix: This is the base of your brownies. The mix takes all the guesswork out of measuring cocoa, flour, and sugar, giving you that signature red velvet flavor and color effortlessly.
- 2 large eggs (room temperature): Eggs help bind the mix and add moisture, making your brownies tender and fudgy. Bringing them to room temperature ensures they blend more evenly.
- 3/4 cup coconut oil (melted and slightly cooled): I love using coconut oil here instead of butter—it adds a subtle richness and keeps the brownies wonderfully moist. Plus, it’s a great option if you want a dairy-free twist.
- 1 cup white chocolate chips: These little gems melt slightly during baking, creating pockets of creamy sweetness that contrast perfectly with the slight tang of the red velvet.
- 1 teaspoon vanilla extract: Vanilla adds depth and rounds out all the flavors, making the brownies taste even more indulgent.
How to Make Red Velvet Brownies with White Chocolate Chips
Now, I’m going to walk you through this recipe step-by-step. It’s so simple that you’ll be amazed at how quickly you can have these delicious brownies ready to share.
- Preheat your oven to 350°F (175°C). This ensures your oven is hot and ready, so your brownies bake evenly.
- Line a 9×13 inch baking pan with parchment paper, leaving an overhang. This little trick makes it super easy to lift the brownies out of the pan once they’re cooled, so you can cut clean squares without any fuss.
- In a large mixing bowl, combine the red velvet cake mix, eggs, melted coconut oil, and vanilla extract. Stir these ingredients together gently until just combined. Be careful not to overmix—overworking the batter can make the brownies tough instead of tender.
- Fold in the white chocolate chips. Gently mix them in so that they’re evenly distributed without breaking.
- Pour the batter into your prepared pan and spread it out evenly. Use a spatula to smooth the top, so your brownies bake uniformly.
- Bake for 18-22 minutes. You want the top to be set but the center to still have a slight jiggle when you gently shake the pan—this ensures a moist, fudgy brownie rather than a dry one.
- Remove from the oven and let the brownies cool completely in the pan. This is important because the brownies will firm up as they cool, making them easier to cut and handle.
- Once cooled, use the parchment paper overhang to lift the brownies out of the pan. Cut into squares and enjoy!
If you’re a fan of rich desserts, you might also enjoy my take on Easy S’more Bars with Chocolate and Graham, which are another quick and crowd-pleasing treat perfect for any occasion.
Substitutions & Additions
One of the things I love about this recipe is how flexible it is. Here are some fun substitutions and additions you can try to make these brownies your own:
- Swap coconut oil with butter: If you prefer a classic buttery flavor, melted unsalted butter works beautifully here. Just be sure it’s cooled before mixing.
- Use dark or milk chocolate chips instead of white: For a richer, more traditional brownie experience, dark chocolate chips add a delightful bittersweet contrast.
- Add a cream cheese swirl: For an extra creamy texture and tang, you can dollop softened cream cheese mixed with a little sugar and vanilla on top of the batter before baking. Swirl it gently with a knife for a marbled effect.
- Incorporate chopped nuts: Pecans or walnuts add a lovely crunch and complement the soft texture of the brownies.
- Try a splash of espresso powder: Just a teaspoon will enhance the chocolate flavor and deepen the red velvet taste without making it taste like coffee.
For a savory twist to balance your sweet cravings, after you’ve enjoyed these brownies, you might want to check out the French Onion Soup Pasta recipe. It’s a comforting and delicious meal that’s easy to make and perfect for cozy nights in.
Tips for Success
To make sure your Red Velvet Brownies with White Chocolate Chips turn out perfectly every time, here are some tips I’ve picked up along the way:
- Don’t overmix the batter: Stir just until combined. Overmixing can develop gluten and make the brownies dense and chewy instead of soft and tender.
- Use room temperature eggs: Cold eggs don’t mix as well and can cause the batter to seize or become uneven.
- Watch your baking time carefully: Ovens vary, so start checking at 18 minutes by gently shaking the pan. The center should jiggle slightly but not be liquidy.
- Cool completely before cutting: Patience here pays off—cutting warm brownies can cause them to crumble and lose their shape.
- Line your pan with parchment paper: This makes cleanup easier and helps you lift the brownies out without breaking them.
- Prep ahead: You can mix the batter a few hours ahead and let it rest in the fridge, just bring it back to room temperature before baking for the best texture.
How to Store Red Velvet Brownies with White Chocolate Chips
These brownies are best enjoyed fresh, but they keep well too! Here’s how to store them to maintain their moist, fudgy goodness:
- At room temperature: Store the brownies in an airtight container or cover the pan tightly with plastic wrap. They’ll stay fresh for 3-4 days.
- In the refrigerator: If you want to keep them longer, you can refrigerate them for up to a week. Just bring them to room temperature before serving for the best flavor.
- Freezing: These brownies freeze wonderfully. Wrap individual squares tightly in plastic wrap and place them in a freezer-safe bag or container. They’ll keep for up to 3 months. Thaw at room temperature before eating.
For more tips on making and storing easy, delicious desserts that fit into your busy life, you might want to explore other recipes like the Dark Chocolate Lovers Mount Doom Cake, which is another decadent treat with a rich twist.
FAQs
Can I use butter instead of coconut oil?
Absolutely! Melted unsalted butter will work just as well and add a classic richness to your brownies.
What if I don’t have white chocolate chips?
You can substitute with milk or dark chocolate chips, or even chopped white chocolate bars if you have those on hand.
How do I know when the brownies are done?
Look for the top to be set and slightly crackly, with a gentle jiggle in the center when you shake the pan. This ensures they stay fudgy and moist.
Can I make these gluten-free?
Yes! Use a gluten-free red velvet cake mix and check that your white chocolate chips are gluten-free as well.
I hope you enjoy making these Red Velvet Brownies with White Chocolate Chips as much as I do. They’re perfect for any occasion where you want a little sweet comfort. For even more cozy dessert inspiration, don’t forget to check out the Navy at Home blog, where you’ll find plenty of delicious recipes to satisfy every craving.
Happy baking, and if you want to stay inspired with easy and creative kitchen ideas, be sure to follow us on Pinterest!