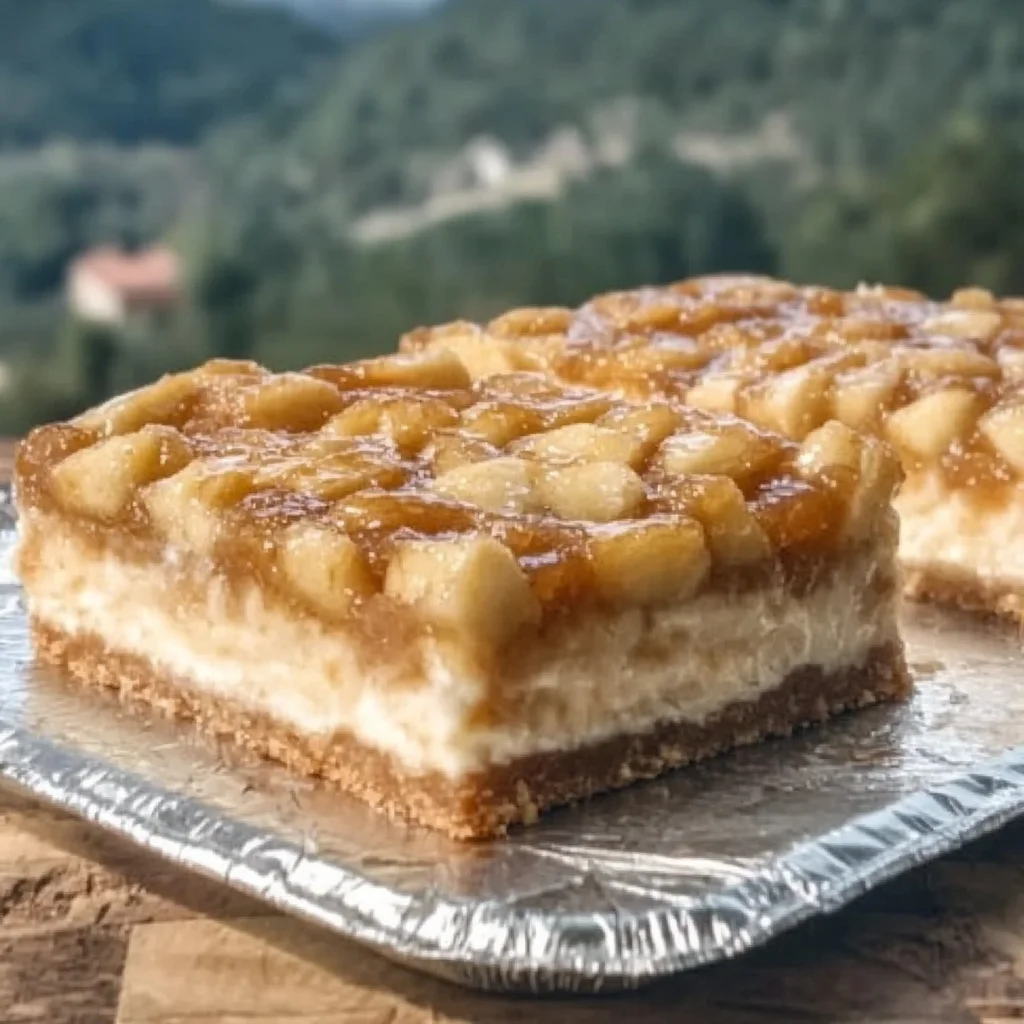
There’s something truly magical about the smell of warm apples and cinnamon wafting through the kitchen. It instantly takes me back to those cozy fall afternoons, wrapped up in a soft sweater, sipping hot cider, and waiting for the perfect slice of dessert to come out of the oven. If you love classic apple pie but sometimes wish it had a little something extra, then you’re going to adore these Apple Pie Cheesecake Bars. They combine the best of two beloved desserts — creamy cheesecake and spiced apple pie — into one simple, irresistible treat.
What’s even better? These bars are incredibly easy to make and perfect for any occasion. Whether you’re whipping up a last-minute dessert for friends, looking for a gift that everyone will rave about, or just craving a comforting sweet snack, apple pie cheesecake bars are a total winner. And trust me, once you try them, you’ll want to make them again and again.
Why You’ll Love Apple Pie Cheesecake Bars
- Fast: Ready in under an hour, including baking time.
- Easy: Minimal ingredients and straightforward steps — no fancy techniques needed.
- Giftable: Makes a charming homemade gift for neighbors, teachers, or coworkers.
- Crowd-pleasing: A perfect dessert for gatherings, potlucks, or holiday dinners.
Ingredients
Before you start, here’s what you’ll need to bring these bars to life. Each ingredient plays a special role in the flavor and texture, making this recipe so comforting and delicious.
- 1 can apple pie filling: The star of the show! Using canned filling keeps things simple and consistent, but you can always make your own if you prefer fresh apples.
- 8 oz cream cheese, softened: This adds that rich, creamy layer that balances the sweetness and tartness of the apples.
- 1 box yellow cake mix: Instead of making a crust, this dry cake mix creates a crumbly, buttery topping that bakes to golden perfection.
- 1/2 cup butter, melted: Poured over the dry cake mix, it moistens and binds the topping for a lovely crisp finish.
How to Make Apple Pie Cheesecake Bars
Let’s walk through this recipe together. I’ll guide you step-by-step to ensure your bars come out just right — creamy, fruity, and perfectly sweet.
- Preheat your oven to 350°F (175°C). This is the perfect temperature to bake the bars evenly without drying them out.
- Spread the apple pie filling evenly in the bottom of a 9×13-inch baking pan. I like to use a glass or metal pan with high sides so the layers stay put while baking. Spread the filling with a spatula so it’s smooth and covers every corner.
- Beat the cream cheese until smooth. Use a hand mixer or stand mixer to get the cream cheese silky and lump-free. Then, carefully spread this creamy layer over the apple pie filling. It might look a bit soft, but don’t worry — it will set as it bakes.
- Sprinkle the yellow cake mix evenly over the cream cheese layer. Try to cover the entire surface without pressing down. This dry layer will soak up the melted butter and bake into a crisp topping.
- Pour the melted butter evenly over the cake mix. This step is key for that golden-brown, buttery crust everyone will love. Pour slowly and evenly, using a spoon to distribute if needed.
- Bake for 35-40 minutes. You want the top to be nicely golden and bubbling around the edges. A toothpick inserted near the center should come out mostly clean — a few moist crumbs are fine.
- Allow to cool completely. This part takes some patience, but cooling lets the cheesecake layer firm up so you can cut neat bars. I usually let mine sit at room temperature for an hour, then pop it in the fridge for another hour if I’m not serving right away.
Substitutions & Additions
One of my favorite things about this recipe is how flexible it is! Feel free to tweak it to your taste or what you have on hand.
- Swap the apple pie filling: Try peach, cherry, or blueberry pie filling for a fruity twist.
- Use reduced-fat cream cheese: For a lighter version, but keep in mind it might be less creamy.
- Experiment with cake mix flavors: Spice cake or yellow cake with added cinnamon can enhance the fall vibes even more.
- Add nuts: Sprinkle chopped walnuts or pecans over the cake mix before pouring the butter for extra crunch.
- Top with streusel: Mix together brown sugar, flour, butter, and cinnamon, and sprinkle on top for a crumbly finish.
- Drizzle with caramel sauce: A warm caramel drizzle over the cooled bars takes them to dessert heaven.
Tips for Success
Having made these bars countless times, I’ve picked up a few tricks that make the process foolproof and the results perfect every time.
- Softened cream cheese is a must: Take it out of the fridge 30 minutes before mixing, or soften gently in the microwave in short bursts to avoid lumps.
- Don’t press the cake mix down: Keep it loose so the butter can soak in and create that great crumbly texture.
- Cool completely before cutting: This helps the cheesecake layer set so your bars don’t fall apart.
- Use a sharp knife dipped in hot water: Wipe the blade clean between cuts for neat slices.
- Prep ahead: You can assemble these bars the night before and refrigerate, then bake fresh the next day for an easy entertaining win.
How to Store Apple Pie Cheesecake Bars
These bars keep well and stay delicious for several days — perfect if you’re making a batch to enjoy over time or share with others.
- Refrigerate: Store leftover bars in an airtight container in the fridge for up to 4-5 days. The cream cheese layer stays fresh and creamy.
- Freeze: For longer storage, wrap bars tightly in plastic wrap and foil, then freeze for up to 2 months. Thaw overnight in the fridge before serving.
- Serve chilled or room temperature: I love these bars straight from the fridge for a cool, creamy bite, but letting them sit out for 15-20 minutes softens the flavors and texture beautifully.
FAQs
Can I use fresh apples instead of canned pie filling?
Absolutely! If you want to make your own filling, peel and dice about 3-4 cups of apples, then cook them down with sugar, cinnamon, and a bit of cornstarch until thickened. Let it cool before layering.
Can I make these bars gluten-free?
You can try using a gluten-free yellow cake mix and make sure your pie filling is gluten-free as well. The texture may vary slightly but still delicious!
Do I need to refrigerate the bars after baking?
Since these bars have cream cheese, I recommend refrigerating them to keep them fresh. They taste great chilled or at room temperature after a short rest.
Can I double the recipe for a larger batch?
Definitely! Just use a larger pan or two 9×13 pans and adjust baking time slightly. Keep an eye on the bars; they’re done when the top is golden and bubbly.
If you enjoy easy, comforting desserts like this, you might also love the triple lemon meringue cheesecake for a bright, tangy twist. Or, for a cozy dinner to pair after dessert, try the easy flavorful chicken ramen — it’s soul-warming and simple to prepare. And if you’re looking for another sweet treat to keep on hand, these easy s’more bars are a delicious crowd-pleaser with chocolate and graham cracker goodness.
So next time you’re craving something cozy and sweet, give these Apple Pie Cheesecake Bars a try. They’re like a warm hug in dessert form — simple, satisfying, and oh-so-good.
For more kitchen inspiration and tasty recipes, be sure to follow us on Pinterest!
Deliciously Easy Apple Pie Cheesecake Bars
Ingredients
Equipment
Method
- Step 1: Preheat your oven to 350°F (175°C).
- Step 2: Spread the apple pie filling evenly in the bottom of a 9×13-inch baking pan.
- Step 3: Beat the cream cheese until smooth. Spread this creamy layer evenly over the apple pie filling.
- Step 4: Sprinkle the yellow cake mix evenly over the cream cheese layer without pressing down.
- Step 5: Pour the melted butter evenly over the cake mix to moisten and bind the topping.
- Step 6: Bake for 35-40 minutes until the top is golden and bubbling. A toothpick inserted near the center should come out mostly clean.
- Step 7: Allow to cool completely before cutting into bars. For best results, cool at room temperature for 1 hour, then refrigerate for another hour if not serving immediately.