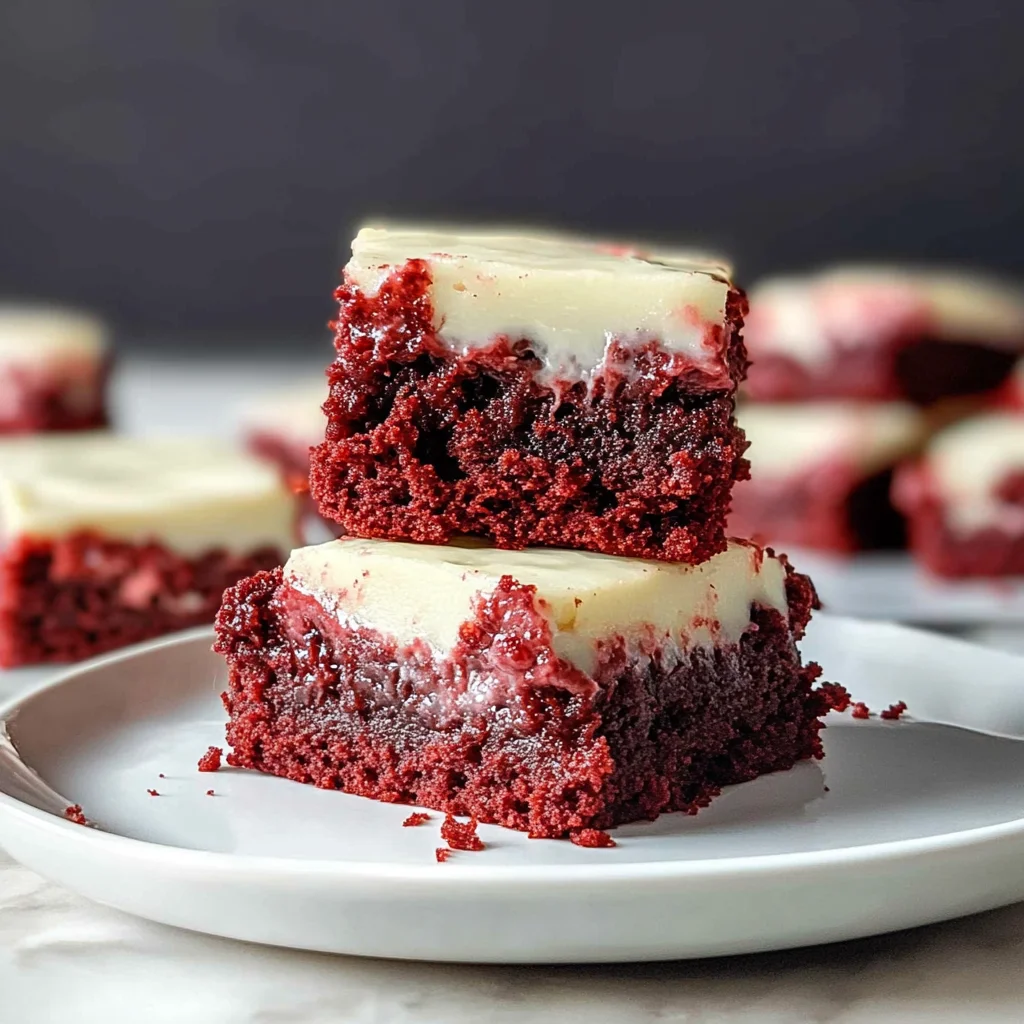
There’s something truly magical about the first bite of a red velvet brownie—the rich, moist cake paired with that dreamy cream cheese frosting creates a cozy comfort that feels like a warm hug from the inside out. I still remember the first time I tried making red velvet brownies at home; it was a chilly evening, and the sweet, tangy aroma filled my kitchen, instantly lifting my spirits. Whether you’re baking for a special occasion or just craving a luscious treat to enjoy with your afternoon coffee, these red velvet brownies are surprisingly quick and easy to whip up. Trust me, once you try this recipe, it’ll become your go-to dessert whenever you want something both classic and a little unexpected.
Why You’ll Love Red Velvet Brownies
- Fast: Ready in under an hour, including baking and cooling time.
- Easy: Simple ingredients and straightforward steps make it beginner-friendly.
- Giftable: Beautifully red and topped with luscious cream cheese frosting, perfect for sharing.
- Crowd-pleasing: A lovely balance of chocolate and tangy sweetness that appeals to all ages.
Ingredients
This recipe uses everyday pantry staples with a few special touches that make it uniquely red velvet. Here’s what you’ll need:
- Butter: Melted butter forms the rich base; you can use regular or dairy-free depending on your preference.
- Light brown sugar and granulated sugar: A combo that adds moisture and sweetness with a hint of caramel flavor.
- Eggs: These bind everything together and give the brownies structure.
- Vanilla extract: Adds warmth and depth to the flavor.
- Liquid red food coloring: The signature color that makes these brownies stand out.
- White vinegar: Helps activate the cocoa powder and adds a subtle tang.
- Cocoa powder: Just enough to give a chocolatey note without overpowering the red velvet taste.
- Salt: Balances the sweetness and enhances all the flavors.
- All-purpose flour: Provides the structure for the brownies, just the right amount to keep them fudgy yet cakey.
For the cream cheese frosting, you’ll need:
- Cream cheese: The star of the frosting, giving it that creamy tang.
- Butter: Softened to blend smoothly with the cream cheese.
- Vanilla extract and salt: To enhance the flavor.
- Powdered sugar: Sweetens and thickens the frosting.
- Cornstarch: Optional, especially helpful if you’re making a dairy-free version to get the right consistency.
How to Make Red Velvet Brownies
Getting these brownies just right is all about gentle mixing and timing. Here’s how you can make them step-by-step:
- Preheat your oven to 350°F (175°C). Line an 8×8-inch square baking pan with parchment paper, making sure to leave an overhang on the sides. This will help you lift the brownies out easily once they’re baked.
- Melt the butter in a microwave-safe bowl or on the stovetop. Pour it into a medium bowl and whisk in both the light brown sugar and granulated sugar. You want to mix until it forms a thick paste that pulls cleanly from the sides of the bowl. This step is key to ensuring your brownies have a nice, chewy texture.
- Add the wet ingredients: Crack in the eggs, then add the white vinegar, vanilla extract, and red food coloring. Whisk everything together until it’s fully combined and smooth. The batter will have a lovely bright red hue that makes these brownies so fun to bake and eat.
- Mix the dry ingredients: Sift together the cocoa powder, salt, and all-purpose flour. Sifting helps avoid lumps and ensures even distribution.
- Combine wet and dry: Gradually add the dry ingredients to the wet mixture. Use a whisk or spatula to gently fold until just combined. Be careful not to overmix; you want the brownies to stay tender, not tough.
- Pour the batter into your prepared pan and spread it out evenly with a spatula. The batter is thick but smooth, and spreading it evenly helps it bake uniformly.
- Bake for 30 to 40 minutes. Start checking around 30 minutes by inserting a toothpick into the center. You want the toothpick to come out with a few moist crumbs but no wet batter. The top should be slightly crinkly and shiny—perfectly baked but still fudgy inside.
- Cool completely: Remove the brownies from the oven and let them cool in the pan. This can take about an hour, but it’s worth the wait so your frosting doesn’t melt when you spread it on.
- Make the frosting: In a mixing bowl, beat together the cream cheese, softened butter, vanilla extract, and a pinch of salt until smooth and creamy. Gradually add powdered sugar, tasting as you go, until you reach your desired sweetness and thickness. If you need a dairy-free option, mix in the cornstarch to thicken it up nicely.
- Frost the brownies: Pop the frosting in the fridge until it’s firm enough to spread easily. Then, gently spread it over the cooled brownies with a spatula or the back of a spoon. For an extra festive touch, you can sprinkle some red velvet crumbs or even mini chocolate chips on top.
- Serve and enjoy: Cut into squares using the parchment paper overhang for easy lifting. These brownies are perfect for sharing, gifting, or keeping all to yourself (I won’t judge!).
Substitutions & Additions
One of the things I love about this recipe is how flexible it is. Whether you need to swap ingredients due to allergies or just want to mix things up a bit, here are some ideas:
- Dairy-free options: Use coconut oil or vegan butter instead of regular butter, and swap cream cheese for a dairy-free cream cheese alternative. Adding cornstarch to the frosting helps keep it thick and spreadable.
- Food coloring alternatives: If you prefer to avoid artificial colors, try using natural beet juice or powder for that reddish tint. Keep in mind the color may be a bit more muted.
- Add-ins: Fold in white chocolate chips or chunks for extra sweetness and texture. Toasted pecans or walnuts also add a lovely crunch.
- Frosting variations: For a lighter frosting, try topping your brownies with whipped cream cheese mixed with a bit of powdered sugar and vanilla. Or skip the frosting altogether and dust with powdered sugar for a simpler finish.
If you’re interested in exploring other quick and flavorful dessert ideas, you might enjoy the delightful strawberry crunch cookies or the tropical twist of pineapple upside-down sugar cookies. Both are fantastic for mixing up your baking routine!
Tips for Success
Baking red velvet brownies is straightforward, but a few little tips can make a big difference in your final result:
- Don’t overmix: Once you add the flour, mix just until combined. Overmixing develops gluten and can lead to tough brownies.
- Check your oven temperature: Ovens can vary, so use an oven thermometer if you have one. Too hot, and the edges will overbake before the center is done.
- Use parchment paper: This makes removing the brownies a breeze and helps keep the edges from getting too crispy.
- Cool completely: The frosting needs a cool surface to spread on, or it will melt and slide right off.
- Make frosting ahead: You can prepare the frosting a day in advance and keep it refrigerated. Just let it come to room temperature and give it a quick stir before spreading.
For an extra serving of kitchen inspiration and cozy recipes, you might enjoy the comforting vibes of easy flavorful chicken ramen—perfect for a chilly day when you want something warm and satisfying.
How to Store Red Velvet Brownies
Once you’ve baked and frosted these beauties, you’ll want to store them properly to keep them fresh and delicious. Here’s how to do it:
- At room temperature: If you plan to eat the brownies within one day, store them in an airtight container. Keep the frosting side up and separate layers with parchment paper to prevent sticking.
- In the refrigerator: Because of the cream cheese frosting, refrigeration is best if you want to keep them longer than a day. Store in an airtight container or cover tightly with plastic wrap. They’ll stay fresh for about 4 to 5 days.
- Freezing: You can freeze unfrosted brownies wrapped tightly in plastic wrap and then foil for up to 3 months. Thaw at room temperature and frost just before serving. Frosted brownies can be frozen too, but the texture of the frosting may change slightly.
Proper storage not only preserves flavor but also keeps your brownies moist and wonderfully tender—exactly as you want them.
FAQs
Q: Can I make these brownies gluten-free?
A: Absolutely! Substitute the all-purpose flour with a gluten-free flour blend that measures cup-for-cup. Just be sure your blend contains xanthan gum or another binder to keep the texture right.
Q: What if I don’t have red food coloring?
A: You can use natural alternatives like beet juice or powder, but the color might be less vivid. If you skip the coloring entirely, you’ll still have delicious chocolatey brownies—just without the classic red velvet look.
Q: Can I make these brownies vegan?
A: With a few swaps, yes! Use vegan butter, a flax or chia seed egg substitute, dairy-free cream cheese, and cornstarch in the frosting to thicken it. The texture will be a little different but still delightful.
Q: How thick should the frosting be?
A: The frosting should be thick enough to spread without running but soft enough to easily smooth over the brownies. If it’s too stiff, add a teaspoon of milk or dairy-free milk; if too thin, add a little more powdered sugar or cornstarch.
For more great recipes and kitchen tips, don’t forget to check out WhizTips, where you’ll find everything from savory meals to sweet treats.
And if you’re a fan of delightful kitchen inspiration, make sure to follow our Pinterest account for lots of cozy recipes and creative ideas to brighten your day!
Deliciously Decadent Red Velvet Brownies
Ingredients
Equipment
Method
- Step 1: Preheat your oven to 350°F (175°C). Line an 8×8-inch square baking pan with parchment paper, leaving an overhang on the sides.
- Step 2: Melt the butter and pour it into a medium bowl. Whisk in light brown sugar and granulated sugar until it forms a thick paste that pulls cleanly from the sides.
- Step 3: Add eggs, white vinegar, vanilla extract, and red food coloring to the bowl. Whisk until fully combined and smooth with a bright red hue.
- Step 4: Sift together cocoa powder, salt, and all-purpose flour. Gradually add to the wet ingredients and gently fold until just combined; avoid overmixing.
- Step 5: Pour batter into the prepared pan and spread evenly with a spatula.
- Step 6: Bake for 30 to 40 minutes. Check at 30 minutes with a toothpick; it should come out with a few moist crumbs but no wet batter. The top will be slightly crinkly and shiny.
- Step 7: Remove brownies from oven and cool completely in the pan, about 1 hour, to prevent frosting from melting.
- Step 8: In a mixing bowl, beat together cream cheese, softened butter, vanilla extract, and salt until smooth. Gradually add powdered sugar, adjusting sweetness and thickness. Stir in cornstarch if using for dairy-free frosting.
- Step 9: Refrigerate frosting until firm enough to spread. Gently spread over cooled brownies. Optionally, sprinkle red velvet crumbs or mini chocolate chips on top.
- Step 10: Cut into squares using parchment paper overhang for easy lifting. Serve and enjoy.