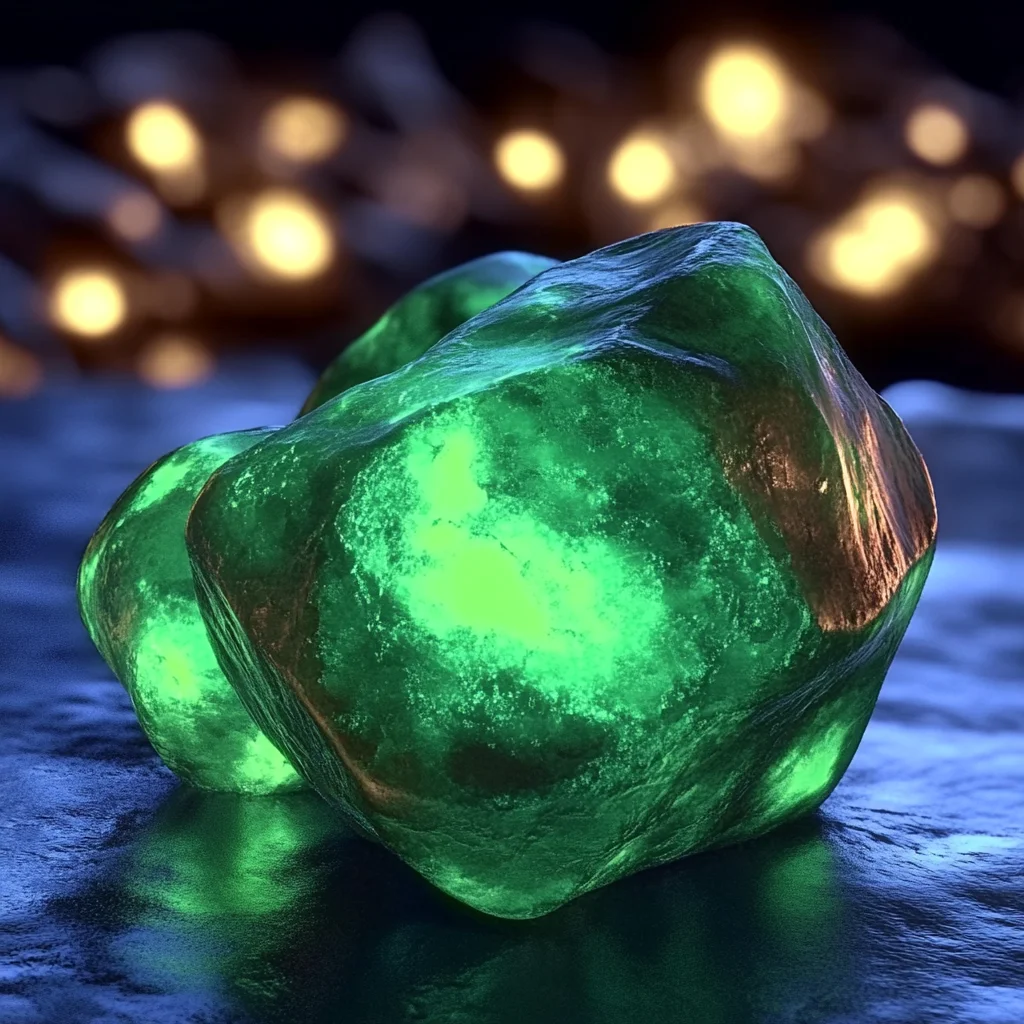
Do you remember those childhood nights when you’d stare up at the stars, wishing you could hold a piece of the glowing moon in your hand? Those magical moments of wonder and curiosity are exactly what inspired this fun, simple project: Glow in the Dark Moon Rocks. Not only are these glowing little treasures fascinating to make, but they also bring a bit of that starry-night magic right into your home. Whether you’re crafting with kids, looking for a unique gift idea, or just want to add a whimsical touch to your decor, these moon rocks are an absolute delight.
What I love most about this recipe is how quick and easy it is, yet the results feel so special and memorable. You only need a handful of ingredients and a bit of patience while they dry. Plus, the glow-in-the-dark effect adds a playful surprise that will have everyone coming back for more. If you enjoy simple DIY projects or love creating edible-inspired treats like [strawberry crunch cookies](https://www.navyathome.com/strawberry-crunch-cookies/ for your friends and family, you’re going to adore these moon rocks!
Why You’ll Love Glow in the Dark Moon Rocks
- Fast: You can whip up a batch in under 10 minutes, with minimal cleanup.
- Easy: No fancy equipment or baking required—just mix, shape, and dry.
- Giftable: These make charming, homemade gifts for birthdays, holidays, or party favors.
- Crowd-pleasing: Kids and adults alike are fascinated by the glowing magic.
Ingredients
Gathering your ingredients is the first fun step because you’ll see just how simple this all is. Here’s what you need:
- 1 cup baking soda: This is the base ingredient that gives your moon rocks their sandy, moldable texture.
- ¼ cup water (more if needed): Adding water gradually helps you reach that perfect damp sand consistency, so don’t rush this part.
- Glow-in-the-dark non-toxic paint or glow pigment powder: Make sure it’s kid-safe if you’re crafting with little ones. This is what makes the magic happen!
- Optional: Glitter or food-safe coloring: Add sparkle or color for extra pizzazz and a personalized touch.
- Optional: Small rocks or crumbled chalk: These add texture and make your moon rocks look even more authentic and fun to touch.
Each of these ingredients plays a key role in creating moon rocks that are both beautiful and safe to handle. For example, the non-toxic glow paint ensures you can use these in kids’ rooms without worry, while the optional glitter adds that extra wow factor I’m always after when making DIY gifts.
How to Make Glow in the Dark Moon Rocks
Ready to get your hands a little messy? Here’s a step-by-step guide to making your very own glowing moon rocks. I’ll walk you through the process carefully, so you feel confident every step of the way.
- Combine the baking soda and glow pigment: Start by pouring the baking soda into a mixing bowl. Add a few teaspoons of your glow-in-the-dark paint or pigment powder. Stir gently but thoroughly to ensure the glow pigment is evenly distributed throughout the baking soda. This step sets the foundation of your moon rocks, so take a moment to mix well.
- Add water gradually: Slowly pour in the water, a little at a time, stirring as you go. You want to reach a texture that looks and feels like damp sand—moist enough to hold shape but not too wet that it’s sticky or runny. If it feels too wet, sprinkle in a bit more baking soda; if too dry, add a few drops more water.
- Mix in optional extras: This is where you can get creative. Toss in some glitter to make your moon rocks sparkle under the light, or add food-safe coloring if you want colored glows instead of just the classic pale green. If you like a bit of extra texture, small rocks or crumbled chalk pieces work perfectly to give a realistic feel.
- Shape your moon rocks: Now the fun part—use your hands to form the mixture into small, rough, rocky shapes. Don’t worry about making them perfect; the more irregular, the better! This is what gives them their authentic moon rock charm.
- Dry overnight: Place your shaped moon rocks on a tray or plate and let them air-dry completely overnight. This step is crucial for them to harden properly so they hold their shape and glow well. I usually leave mine near a sunny window to help speed up the drying process.
- Charge and glow: Once dried, charge your moon rocks under a bright light source—natural sunlight works great, or a strong lamp. Then, turn off the lights and watch the magic unfold as your moon rocks glow softly in the dark. It’s like holding a piece of the night sky!
Making these moon rocks is such a satisfying experience. I often find myself making a few batches, experimenting with different colors and textures. If you enjoy recipes with a comforting twist, like the [French onion soup pasta comfort food twist](https://www.navyathome.com/french-onion-soup-pasta-comfort-food-twist/, you’ll appreciate how this project brings a little cozy creativity to your day.
Substitutions & Additions
Feeling adventurous or need to swap out some ingredients? No problem! Here are some easy substitutions and fun ideas to customize your moon rocks:
- Substitute water with liquid glue: For a slightly firmer rock that lasts longer, try replacing half the water with non-toxic white glue. This also helps moon rocks hold up better if they’re handled a lot.
- Use chalk powder instead of baking soda: If you want a smoother texture, finely crushed chalk makes a great alternative to baking soda. Just be sure it’s non-toxic.
- Color variations: Try using different glow pigment colors—blue, purple, or even pink—to create a unique collection of moon rocks. Mixing colors can give a galaxy-like effect that’s stunning in the dark.
- Extra sparkle: Adding a pinch of edible glitter or mica powder can create a shimmering surface that catches the light beautifully during the day.
- Texture experiments: Incorporate natural elements like tiny sand grains, crushed seashells, or decorative stones to make your moon rocks feel like little treasures from another world.
In my experience, these tweaks not only make the crafting process more fun but also result in moon rocks that are perfect conversation starters. If you're inspired by playful projects, you might also enjoy learning how to make [crispy rice paper scallion pancakes](https://www.navyathome.com/crispy-rice-paper-scallion-pancakes/)%E2%80%94another simple recipe that delivers impressive results!
Tips for Success
To help you get the best results, here are some of my top tips and common pitfalls to avoid when making glow in the dark moon rocks:
- Don’t rush the drying: The drying stage is key. If your moon rocks aren’t completely dry, they’ll be fragile and won’t hold their shape well. Patience really pays off here.
- Adjust water slowly: Adding too much water at once can make the mixture too sticky. Go slow and add it in small amounts for perfect texture.
- Use gloves if you want to keep hands clean: The glow paint or pigment can stain your skin, so wearing gloves is a good idea, especially if kids are involved.
- Charge under strong light: For the brightest glow, expose your moon rocks to direct sunlight or a strong LED lamp for at least 15 minutes before turning off the lights.
- Prep ahead: You can mix the dry baking soda and glow pigment ahead of time and store it in an airtight container. Just add the water when you’re ready to craft.
Following these tips will make your crafting experience smooth and enjoyable. It’s the little things that make a big difference, and I’ve found that a bit of preparation goes a long way in creating beautiful glowing moon rocks that last.
How to Store Glow in the Dark Moon Rocks
After all your hard work, you’ll want to keep your moon rocks safe and glowing for as long as possible. Here are some storage tips:
- Keep them dry: Store your moon rocks in an airtight container or a sealed plastic bag to prevent moisture from softening them.
- Avoid direct sunlight when not charging: Prolonged exposure to sunlight can fade the glow pigment over time, so keep them in a cool, dark place when not in use.
- Handle gently: Although dry moon rocks harden nicely, they can still be brittle. Treat them like little treasures.
- Shelf life: Properly dried and stored moon rocks can last for months, making them perfect for gifting or seasonal decorations.
When you want to bring them back to life, just charge them again under a bright light, and the glow will reappear like magic. I love keeping a small jar of these on a shelf in my kids’ room—it’s a constant reminder of starry nights and creative play.
FAQs
Q: Can I make glow in the dark moon rocks without glow paint?
A: The glow paint or pigment is what gives the rocks their glowing magic, so without it, they’ll just look like plain baking soda rocks. However, you can still enjoy the texture and shape for a non-glowing craft.
Q: Are these moon rocks safe for kids to play with?
A: Yes! Just make sure to use non-toxic, kid-safe glow paint or pigment. Always supervise young children during crafting, especially if they tend to put things in their mouths.
Q: How long do the moon rocks glow after charging?
A: Typically, they’ll glow brightly for about 10–15 minutes, then gradually fade. Recharging them under a light source brings the glow back again and again.
Q: Can I bake the moon rocks to speed up drying?
A: It’s best to air-dry to avoid cracking or losing the glow effect. If you’re in a hurry, a low-temperature oven (around 150°F) for 15–20 minutes can help, but watch them closely.
If you’ve enjoyed this glowing craft and want to explore more creative recipes and DIY ideas, be sure to visit WhizTips for lots of inspiration. There you’ll find everything from savory dishes like the [grilled steak bowl with herb sauce and charred zucchini](https://www.navyathome.com/grilled-steak-bowl-herb-sauce-charred-zucchini/ to sweet treats and comfort food classics.
Thank you for joining me on this cozy, starry-eyed adventure in the kitchen and craft room. Remember, magic is just a little glow away!
For more crafty inspiration and delicious recipes, be sure to follow our Pinterest board where the fun never stops!
Glow in the Dark Moon Rocks
Ingredients
Equipment
Method
- Step 1: Combine the baking soda and glow pigment in a mixing bowl. Stir thoroughly to evenly distribute the glow pigment throughout the baking soda.
- Step 2: Gradually add water a little at a time, stirring as you go until the mixture reaches a damp sand consistency—moist enough to hold shape but not sticky or runny.
- Step 3: Mix in optional extras like glitter, food-safe coloring, small rocks, or crumbled chalk to add sparkle and texture as desired.
- Step 4: Use your hands to shape the mixture into small, rough, rocky shapes. Irregular shapes give an authentic moon rock look.
- Step 5: Place the shaped moon rocks on a tray or plate and let them air-dry completely overnight to harden.
- Step 6: Charge the dried moon rocks under a bright light source like sunlight or a strong lamp for at least 15 minutes. Then turn off the lights and enjoy the magical glow.