
Do you ever crave sushi but don’t want to fuss with rolling delicate little bites or hunting down a sushi bar? I totally get it! That’s exactly why I adore this Spicy Salmon Sushi Bake. It’s like all the best parts of sushi—creamy, spicy, savory, and fresh—layered into one warm, comforting casserole dish. Think of it as sushi’s cozy cousin: no rolling mats, no dipping bowls, just pure, easy, deliciousness you can scoop straight onto nori sheets or your plate.
This recipe brings back memories of casual dinners with friends where everyone digs in family-style, and no one misses the tricky sushi rolls. Plus, it’s perfect for busy weeknights or last-minute entertaining because it’s quick to prep yet super impressive to serve. I’m excited to walk you through every step and share tips so you can nail this dish just like I do at home. Ready to dive into this spicy, creamy delight? Let’s get started!
Why You’ll Love Spicy Salmon Sushi Bake
- Fast: From start to finish, this bake comes together quickly—perfect for busy days.
- Easy: No sushi rolling skills required! Just mix, layer, and bake.
- Giftable: Make it for friends or potlucks; it’s a unique dish everyone will remember.
- Crowd-pleasing: Bold flavors with creamy texture satisfy even picky eaters.
Ingredients
Each ingredient in this recipe plays a special role in creating layers of flavor and texture that make the sushi bake so irresistible.
- Sushi Rice: 1 cup of sushi rice forms the perfect sticky, slightly tangy base. The vinegar, sugar, and salt seasoning gives it that signature sushi flavor you love.
- Salmon Fillets: Fresh salmon is the star here. I recommend wild-caught if possible for the best taste, but farm-raised works fine too.
- Furikake Seasoning: This Japanese rice seasoning adds a savory umami punch and a bit of crunch. You can find it in most Asian markets or online.
- Soy Sauce: Adds salty depth to the salmon. I use gluten-free tamari to keep it accessible for everyone.
- Cream Cheese & Mayonnaise: These creamy binders soften the salmon and add luscious texture. Kewpie mayo is my favorite for its mild sweetness, but regular mayo works great too.
- Sriracha or Sambal Oelek: For that perfect spicy kick, adjust to your heat preference.
- Toppings: Fresh avocado and cucumber bring a cooling contrast, while green onions add a sharp, fresh bite. Nori sheets are essential for the sushi experience, and unagi sauce drizzled on top adds a sweet-savory finish.
How to Make Spicy Salmon Sushi Bake
Let’s break it down step-by-step. Don’t worry—it’s easier than it looks, and I’ll share little tips along the way to make sure you get it just right.
Step 1: Prepare the Sushi Rice
Start by rinsing your sushi rice under cold water. This removes excess starch and prevents it from becoming too sticky or gummy. I like to use a fine mesh sieve and gently swirl the rice with my fingers until the water runs clear. Then, cook the rice according to package instructions—usually about 20 minutes.
Once your rice is cooked and still warm, gently fold in the rice wine vinegar, sugar, and salt. Use a wooden spatula or rice paddle if you have one, as it helps prevent mashing the grains. Let the rice cool slightly while you prep the rest of the dish.
Step 2: Cook the Salmon
Rub the salmon fillets with soy sauce to infuse flavor. For cooking, I prefer the air fryer method—it’s fast and locks in moisture beautifully. Set it at 400°F and cook for about 10 minutes. If you don’t have an air fryer, baking in the oven at 400°F for 15–20 minutes works just as well. Check for doneness by flaking the salmon with a fork—it should be opaque and easily break apart.
Step 3: Mix the Salmon Filling
In a large bowl, combine the flaked salmon with cream cheese, mayonnaise, and sriracha (or sambal oelek). Mix gently but thoroughly until everything is evenly blended. This creamy, spicy mixture is what gives the bake its rich, luscious texture.
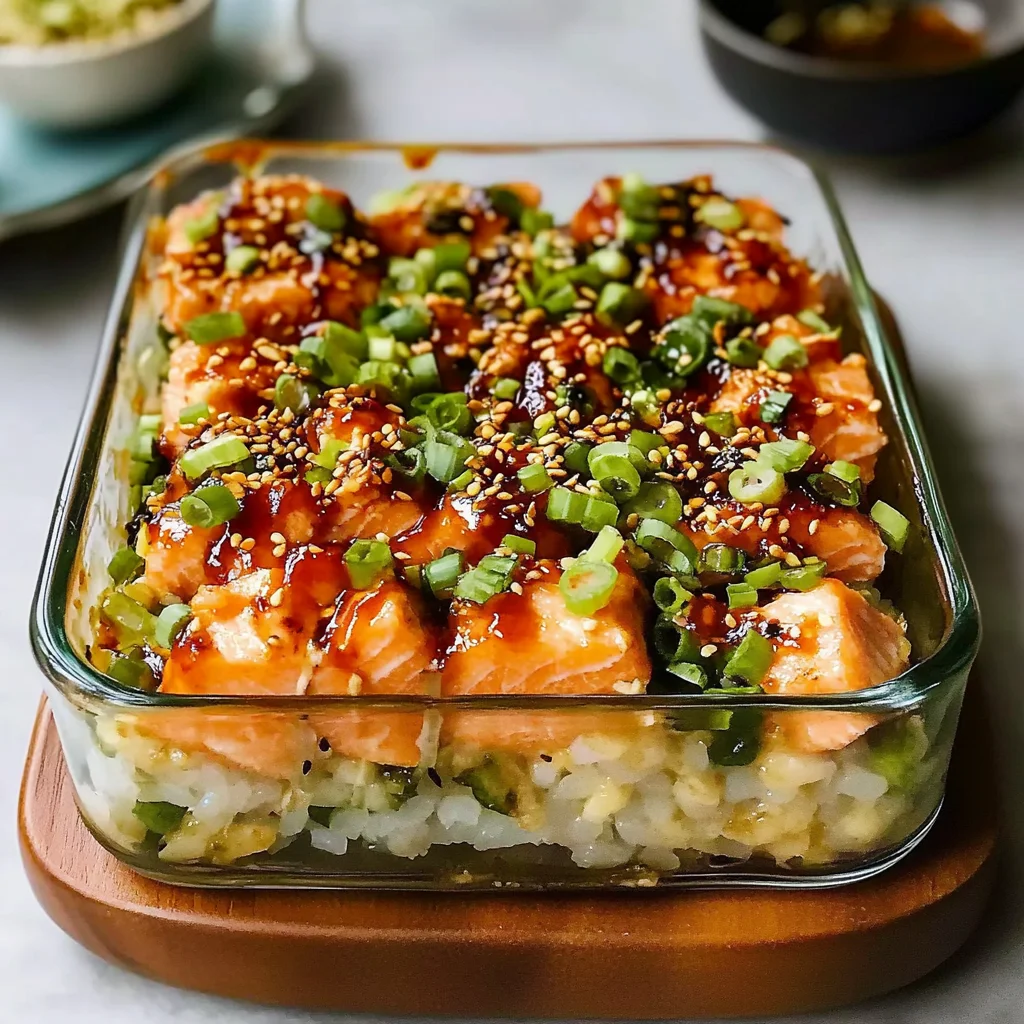
Step 4: Assemble Your Sushi Bake
Preheat your oven to 425°F. Line a 9×9-inch baking dish with parchment paper or lightly grease it to prevent sticking. Press the sushi rice evenly into the bottom of the dish—don’t be shy about packing it down gently, so it holds together when serving.
Sprinkle a generous layer of furikake seasoning over the rice for that savory, slightly crunchy texture. Then, spread your salmon mixture evenly on top.
Step 5: Bake to Perfection
Place the dish in the preheated oven and bake for 15 minutes. You want the bake to be heated through and bubbling slightly around the edges. The top should have a lightly golden hue, signaling that creamy mixture is just right.
Step 6: Add Toppings and Serve
Once out of the oven, drizzle additional Kewpie mayonnaise over the top to add a cool creaminess that balances the heat. Garnish with sliced green onions, cubed or sliced avocado, and cucumber for freshness and crunch. Serve alongside nori sheets and a drizzle of unagi sauce for that perfect sweet-savory finish. Scoop a bit of everything onto a piece of nori and enjoy your homemade sushi bake!
Substitutions & Additions
One of the best things about this Spicy Salmon Sushi Bake is how flexible it is. Feel free to customize it to suit your tastes or what you have on hand.
- Fish Swap: If you’re not a salmon fan, try canned tuna, cooked shrimp, or even crab meat for a different take.
- Spice Level: Adjust the sriracha amount or swap it for a milder chili paste like gochujang for a Korean twist.
- Veggie Boost: Add finely diced bell peppers, shredded carrots, or even edamame to the salmon mixture for extra texture and nutrition.
- Cheese Alternatives: If cream cheese isn’t your thing, mascarpone or ricotta can work in a pinch to keep it creamy.
- Rice Options: Although sushi rice is ideal, you could try short-grain brown rice or cauliflower rice for a lower-carb version, but the texture will differ.
For some creative party snack inspiration that pairs wonderfully with this sushi bake, check out my Super Bowl Snack Playboard post. It’s a fun way to mix up your hosting game!
Tips for Success
I’ve made this dish dozens of times, so here are a few tips to make your sushi bake shine every time:
- Don’t overcook the rice: Sushi rice should be tender but not mushy. Rinse well to get the right texture.
- Cook salmon just right: Overcooked salmon can become dry. Flake it gently and mix with creamy ingredients immediately for moistness.
- Pack the rice firmly: This helps your bake hold together when serving and prevents it from falling apart.
- Use fresh toppings: Avocado and cucumber add freshness that balances the rich, spicy salmon mixture.
- Prep ahead: You can cook and season the rice and salmon mixture a few hours ahead, then assemble and bake just before serving.
If you love cozy casseroles with a twist, you might also enjoy my recipe for Creamy Ground Beef Potato Casserole—it’s another comfort food winner that’s easy to make and sure to please a crowd.
How to Store Spicy Salmon Sushi Bake
If you have leftovers (and trust me, you might!), storing your sushi bake properly will keep it fresh and tasty for the next day or two.
- Refrigerate: Cover the bake tightly with plastic wrap or transfer it to an airtight container. It will keep well for up to 2 days.
- Reheat: Warm leftovers in the oven at 350°F for 10–12 minutes or until heated through. Avoid microwaving if you want to preserve texture, but it works in a pinch.
- Do not freeze: Because of the cream cheese and mayo, freezing can change the texture and make it watery when thawed.
To keep your toppings fresh, store avocado and cucumber separately and add them fresh after reheating.
FAQs
Can I use canned salmon instead of fresh salmon?
Yes! Canned salmon works in a pinch and saves time. Just drain it well and mix it with the other ingredients as usual.
Is this recipe gluten-free?
It can be! Use gluten-free tamari instead of regular soy sauce and make sure your furikake seasoning is gluten-free. Most nori sheets are naturally gluten-free, but double-check the packaging.
Can I make this vegan or vegetarian?
For a vegetarian version, try substituting salmon with cooked mushrooms or tofu and use vegan mayo and cream cheese alternatives. The flavor will be different but still delicious!
What’s the best way to serve this dish?
Serve with nori sheets for wrapping, additional unagi sauce for drizzling, and perhaps a side of pickled ginger or wasabi if you like a little extra zing.
For more creative, bold, and comforting recipes, don’t forget to explore this recipe collection at Navy at Home where you’ll find everything from cozy casseroles to fun snacks like Voodoo Egg Rolls with a Spicy Cheesy Twist. These dishes pair wonderfully with the flavors in this sushi bake and are perfect for your next get-together!
Thanks for cooking along with me today! If you try this Spicy Salmon Sushi Bake, I’d love to hear how it turns out and any creative twists you add.
For more kitchen inspiration and delicious ideas, be sure to follow my Pinterest board. Happy cooking!
Spicy Salmon Sushi Bake
Ingredients
Equipment
Method
- Step 1: Rinse sushi rice under cold water until water runs clear. Cook rice according to package instructions (about 20 minutes). While rice is warm, gently fold in rice wine vinegar, sugar, and salt. Let cool slightly.
- Step 2: Rub salmon fillets with soy sauce. Cook salmon in an air fryer at 400°F for 10 minutes or bake in the oven at 400°F for 15–20 minutes until opaque and flaky. Flake salmon with a fork.
- Step 3: In a large bowl, combine flaked salmon, cream cheese, mayonnaise, and sriracha. Mix gently until evenly blended.
- Step 4: Preheat oven to 425°F. Line a 9×9-inch baking dish with parchment paper or grease it. Press sushi rice evenly into the bottom. Sprinkle furikake seasoning over the rice, then spread the salmon mixture on top.
- Step 5: Bake for 15 minutes until heated through and slightly golden on top.
- Step 6: Remove from oven and drizzle additional mayonnaise over the top. Garnish with sliced green onions, avocado, and cucumber. Serve with nori sheets and a drizzle of unagi sauce.