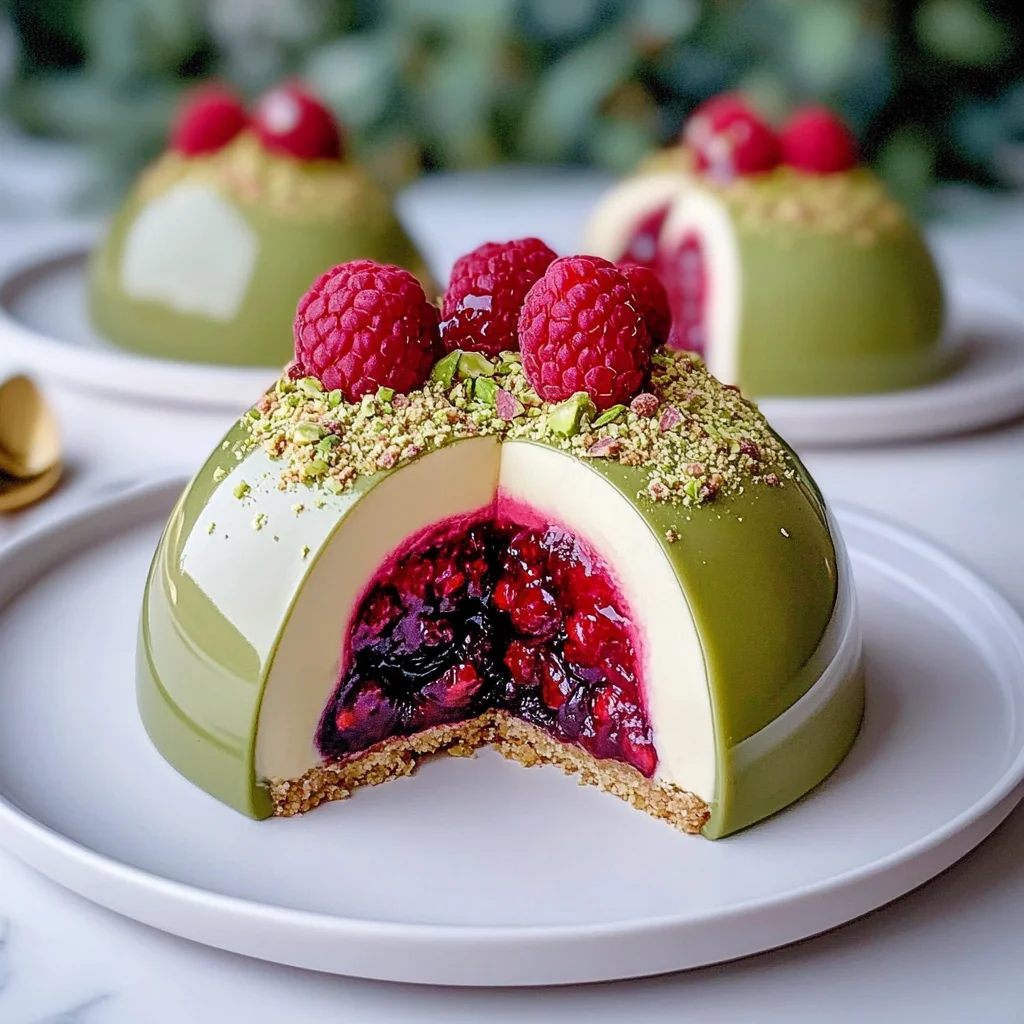
There’s something truly magical about desserts that bring a little surprise inside—like a secret waiting just for you. I still remember the first time I bit into a pistachio cheesecake dome and was greeted by a burst of tangy raspberry filling. It was like a tiny, elegant party in my mouth! These Pistachio Cheesecake Domes with Raspberry Surprise are not only beautiful but also wonderfully easy to make, giving you a fancy-looking dessert with very little fuss. Whether you’re celebrating a special occasion or just craving something sweet and memorable, these domes are sure to become a new favorite.
Why You’ll Love Pistachio Cheesecake Domes with Raspberry Surprise
- Fast: While they look intricate, these domes come together quickly once you get the hang of it.
- Easy: No complicated pastry techniques here—just simple steps and ingredients.
- Giftable: These elegant domes make the perfect homemade gift that shows you care.
- Crowd-pleasing: The creamy pistachio cheesecake paired with a raspberry core is a flavor combo everyone will rave about.
Ingredients
Before you start, gather these ingredients. Each one plays a special role in creating the delicate layers and delightful textures that make these domes so irresistible.
- Digestive or graham crackers: The base of your crust, finely crushed for that perfect crumble.
- Unsalted butter: Melted to bind the crust together.
- Frozen raspberries: For the surprise center—frozen works best to set nicely in the molds.
- Sugar & lemon juice: To sweeten and brighten the raspberry filling.
- Cornstarch: Thickens the raspberry mixture so it holds its shape.
- Cream cheese: The star of the cheesecake layer, softened for easy mixing.
- Heavy cream: Whipped to soft peaks to add lightness.
- White chocolate: Melted and folded in for a silky richness.
- Powdered sugar & vanilla extract: Sweeten and flavor the cheesecake layer.
- Gelatin: Used twice—once for the cheesecake stability and once for the mirror glaze.
- Condensed milk, sugar, and water: Combined for the glossy mirror glaze.
- Green gel food coloring: To tint the glaze that stunning pistachio green.
- Pistachios and fresh raspberries: For a crunchy, fresh topping.
How to Make Pistachio Cheesecake Domes with Raspberry Surprise
Ready to create these show-stopping domes? Let’s take it step by step. Trust me, once you’ve made them, you’ll want to keep these in your dessert rotation.
Step 1: Make the Raspberry Surprise Center
Start by warming the raspberries with sugar and lemon juice in a saucepan over medium heat. Gently stir until the berries start to break down and the mixture bubbles. To thicken, mix cornstarch with water and add it to the pan, cooking for another 1-2 minutes until the filling thickens. Pour this raspberry mixture into silicone dome molds and pop them in the freezer to set solid. This frozen core is the “surprise” that makes the domes so special.
Step 2: Prepare the Crust
While the raspberry centers chill, combine the finely crushed crackers with melted butter. Press this mixture firmly into the base of your dome molds and place them in the fridge to chill and harden. This crust forms a crunchy, buttery foundation for your cheesecake domes.
Step 3: Prepare the Cheesecake Layer
Start by soaking the gelatin in water for about 5 minutes—this helps it bloom and dissolve evenly later. Then, beat the softened cream cheese with powdered sugar and vanilla extract until smooth and creamy. Gently fold in the melted white chocolate (make sure it’s cool enough so it doesn’t scramble the cream cheese). Warm the bloomed gelatin just until it dissolves fully, then stir it into the cheesecake mixture. Finally, whip the heavy cream to soft peaks and carefully fold it in, creating that light, airy texture.
Step 4: Assemble the Domes
Spoon a layer of the cheesecake mixture into your chilled molds, just enough to create a base. Carefully place the frozen raspberry centers into the middle, then cover completely with more cheesecake mixture. Smooth the tops and freeze the domes until they are solid and easy to unmold.
Step 5: Prepare the Mirror Glaze
Soak the gelatin for the glaze in water to bloom. In a saucepan, heat water, sugar, and condensed milk until steaming but not boiling. Pour this hot liquid over the chopped white chocolate and add the gelatin. Stir and blend until you have a smooth, glossy glaze. Add in green gel food coloring to get that perfect pistachio hue. Let the glaze cool to about 32–34°C (90–93°F) before pouring.
Step 6: Glaze and Decorate
Once your domes are frozen solid, unmold them carefully and place on a rack with a tray underneath. Pour the mirror glaze evenly over each dome, covering them completely for that shiny, professional finish. Garnish with finely chopped pistachios and a few fresh raspberries for that extra touch of elegance. Return to the fridge to chill until ready to serve.
Substitutions & Additions
If you’re feeling creative or don’t have certain ingredients on hand, here are some swaps and upgrades you’ll love:
- Crust: Swap digestive or graham crackers with crushed amaretti cookies or even Oreo crumbs for a different flavor profile.
- Raspberry filling: Try substituting with blueberry or strawberry puree for a twist on the surprise center.
- Cheesecake layer: Instead of white chocolate, try milk or dark chocolate for a richer flavor, or skip chocolate altogether for a pure pistachio taste by adding a bit of pistachio paste.
- Mirror glaze: If green isn’t your vibe, experiment with pink or purple gel food coloring to match other flavors or themes.
- Toppings: Toasted coconut flakes or edible flowers add a lovely decorative touch and extra texture.
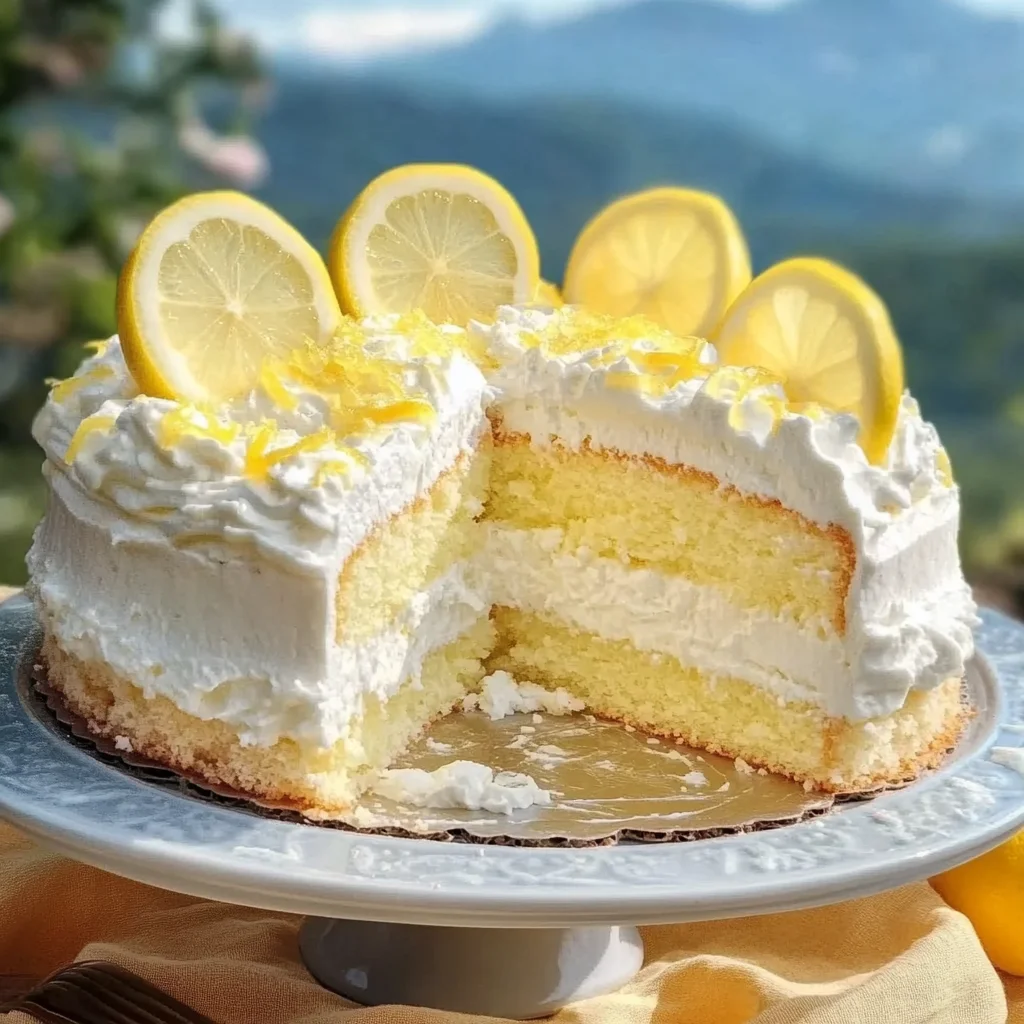
If you love desserts with a luscious creamy texture, you might also enjoy the Triple Lemon Meringue Cheesecake, which brings another level of citrusy brightness to your dessert table!
Tips for Success
Here are some insider tips I’ve learned from making these domes a few times (and accidentally learning what doesn’t work):
- Use silicone molds: They make unmolding your domes so much easier and keep the shape perfect every time.
- Freeze raspberry centers well: Make sure the raspberry filling is fully frozen before inserting into the cheesecake layer to avoid any leaks.
- Don’t rush the glaze temperature: Pouring the mirror glaze too hot can melt the domes, and too cool can cause it to set unevenly.
- Chill the crust: Press the crust firmly and chill it thoroughly before adding the cheesecake layer so it stays in place.
- Prep ahead: You can make the raspberry centers and crust a day in advance and keep them frozen and chilled, respectively. The cheesecake domes themselves can be assembled and frozen up to 2 days before glazing.
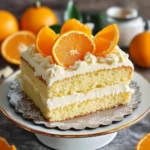
For more easy dessert ideas that wow with flavor and presentation, check out this Strawberry Cheesecake Cinnabon Rolls recipe, perfect for cozy mornings or a sweet treat anytime.
How to Store Pistachio Cheesecake Domes with Raspberry Surprise
Once glazed and decorated, store your domes in the refrigerator in an airtight container to keep them fresh and glossy. They’re best enjoyed within 3-4 days. If you want to make them well ahead, you can keep the domes frozen (unglazed or glazed) for up to 2 weeks—just thaw them overnight in the fridge before serving. The glaze will keep its shine beautifully if handled gently.
FAQs
Can I make these domes without gelatin?
Gelatin is essential here to give the cheesecake layer and mirror glaze their stability and perfect texture. If you prefer a vegetarian option, you can experiment with agar-agar, but the setting times and textures will differ slightly.
Can I use fresh raspberries for the filling?
Fresh raspberries can be used, but the filling may be less firm. Freezing the raspberry centers helps them hold their shape inside the domes, so frozen raspberries are recommended for best results.
How do I get the mirror glaze so shiny?
The key is to pour the glaze at the right temperature (between 90-93°F). Too hot, and it will melt the domes; too cold, and it won’t coat smoothly. Using good quality white chocolate also helps achieve that glossy finish.
Can I make these in larger molds?
Yes, you can scale up the recipe for larger domes or even a cheesecake, but the freezing and setting times will be longer. Smaller molds are easier to handle and make elegant single-serving treats.
If you’re in the mood for more cozy comfort food ideas, this French Onion Soup Pasta recipe is a deliciously warm and easy dish to try after enjoying your cheesecake domes.
Thank you for spending time in the kitchen with me today! I hope these Pistachio Cheesecake Domes with Raspberry Surprise bring a little sparkle to your dessert table and many smiles around it.
For more inspiring recipes and kitchen tips, don’t forget to follow our Pinterest page!
Pistachio Cheesecake Domes with Raspberry Surprise
Ingredients
Equipment
Method
- Step 1: Make the Raspberry Surprise Center by warming frozen raspberries with sugar and lemon juice over medium heat until berries break down and mixture bubbles. Mix cornstarch with water and add to pan, cooking 1-2 minutes until thickened. Pour into silicone dome molds and freeze until solid.
- Step 2: Prepare the crust by combining crushed crackers with melted butter. Press firmly into the base of dome molds and chill in the refrigerator until hardened.
- Step 3: Prepare the cheesecake layer by soaking gelatin in water for 5 minutes. Beat cream cheese with powdered sugar and vanilla until smooth. Fold in melted white chocolate. Warm gelatin until dissolved and stir into the mixture. Whip heavy cream to soft peaks and gently fold in.
- Step 4: Assemble the domes by spooning cheesecake mixture into molds to create a base layer. Place frozen raspberry centers in the middle, then cover completely with more cheesecake mixture. Smooth tops and freeze until solid.
- Step 5: Prepare the mirror glaze by blooming gelatin in water. Heat water, sugar, and condensed milk until steaming. Pour over chopped white chocolate and add gelatin. Stir until smooth and glossy. Add green gel food coloring. Cool glaze to 32–34°C before pouring.
- Step 6: Unmold frozen domes onto a rack with a tray beneath. Pour mirror glaze evenly over each dome to cover completely. Garnish with chopped pistachios and fresh raspberries. Chill in refrigerator until ready to serve.