There’s something incredibly comforting about the smell of warm chocolate filling your kitchen—especially when it’s a cozy homemade brownie, fresh and gooey, ready in just minutes. I still remember those late-night cravings during college when a full batch of brownies felt like too much effort, but a quick brownie in a mug was just perfect. It’s like having a warm hug in dessert form, and the best part? You don’t have to share (unless you want to!).
This Homemade Brownie in a Mug recipe is a true lifesaver. Whether you’re craving a quick chocolate treat after a long day or need an easy dessert that’s sure to impress guests, this recipe delivers rich, fudgy goodness without any fuss. Plus, it’s made from pantry staples and comes together in under five minutes. Trust me, once you try this, it’ll become your go-to comfort dessert for years to come.
Why You’ll Love Homemade Brownie in a Mug
- Fast: Ready in just minutes, perfect for those sudden chocolate cravings.
- Easy: Uses simple ingredients and requires just one mug and a microwave.
- Giftable: Make it special by adding a cute mug and toppings for a quick homemade gift.
- Crowd-pleasing: Everyone loves a warm brownie — great for impromptu gatherings or cozy nights in.
Ingredients
Before you start, let’s take a look at what you’ll need. This recipe is wonderfully simple, featuring ingredients you probably already have in your kitchen.
- All-purpose flour (3.5 tbsp): The base of your brownie, giving it just the right structure.
- Sifted cocoa powder (2.5 tbsp): I love using sifted cocoa to avoid lumps and get that deep chocolate flavor.
- Brown sugar (3.5 tbsp): Adds a lovely caramel undertone and keeps the brownie moist.
- Salt (1/8 tsp): Just a pinch to balance the sweetness and enhance the chocolate.
- Baking powder (1/4 tsp): Helps the brownie rise just enough to be soft and tender.
- Milk (4 tbsp): Makes the batter smooth and helps create that fudgy texture.
- Neutral oil (2 tbsp): Vegetable or canola oil works well here to keep the brownie moist without overpowering flavor.
- Vanilla extract (3/4 tsp): Just a splash to deepen the flavor and add warmth.
- Optional chocolate chips (2.5 tbsp): Melting pockets of chocolate inside make this brownie extra indulgent.
- Optional toppings: Vanilla ice cream, whipped cream, chocolate sauce, or caramel sauce — these add a luscious finishing touch.
How to Make Homemade Brownie in a Mug
Making this brownie is as easy as pie—well, easier! Follow along, and you’ll have a warm, chocolatey treat in no time.
- Mix your dry ingredients: Grab a microwave-safe mug (I recommend at least 12 oz so there’s room for the brownie to rise). Whisk together the flour, sifted cocoa powder, brown sugar, salt, and baking powder. Make sure everything is evenly combined — this ensures your brownie has a consistent flavor and texture throughout.
- Add the wet ingredients: Pour in the milk, oil, and vanilla extract. Stir thoroughly until the batter is smooth, thick but pourable, and free of lumps. The batter should have a rich, chocolatey look — don’t rush this step because a well-mixed batter bakes more evenly.
- Fold in the chocolate chips: Gently stir in the chocolate chips, saving a few to sprinkle on top later if you like. These little melty surprises will take your mug brownie to the next level.
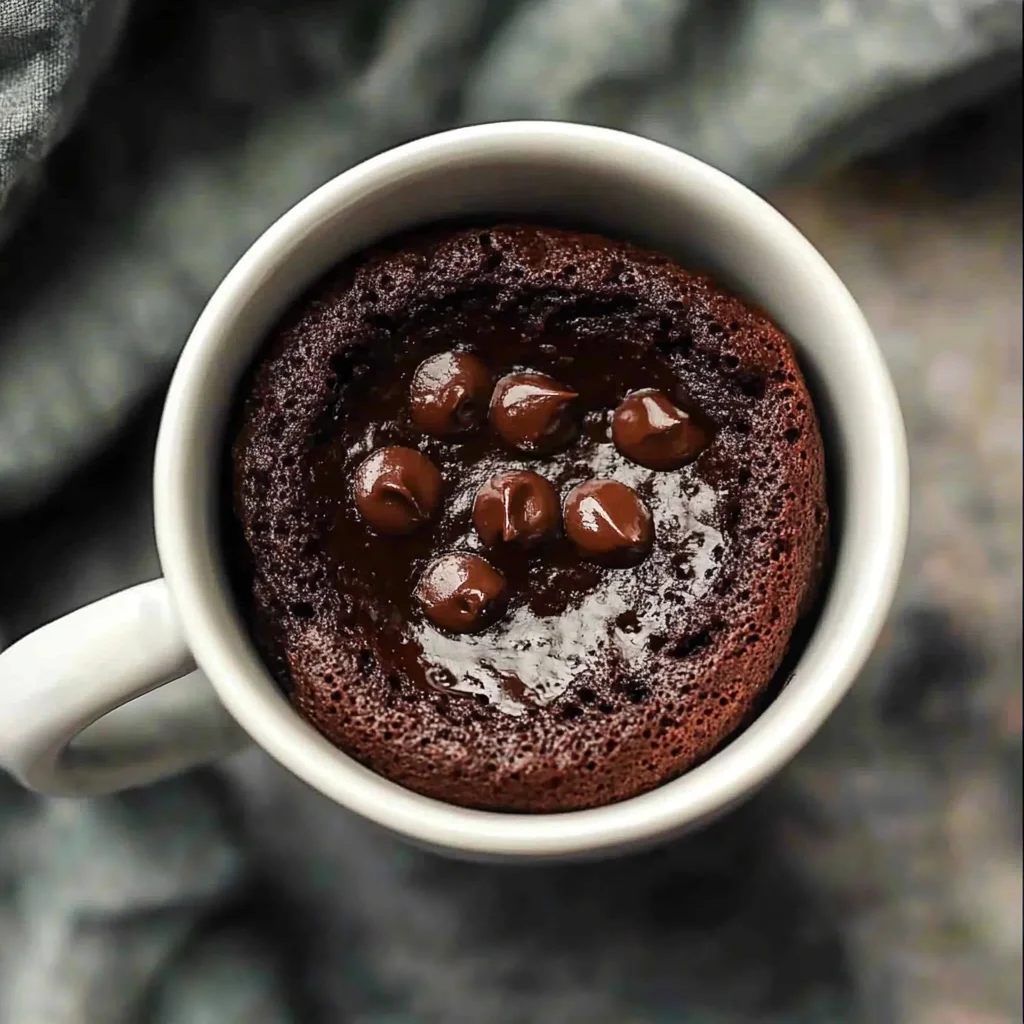
- Microwave it: Pop your mug in the microwave on high for 60 seconds. Check the brownie — it should be set around the edges but might still have a slight jiggle in the center. If it looks too wet, microwave in 5-second bursts until just set. Be careful not to overcook; you want it fudgy, not rubbery.
- Let it rest: After microwaving, let your brownie sit for 3–4 minutes. This step is key because it allows the residual heat to finish cooking the center and helps the brownie develop that perfect gooey texture.
- Add your favorite toppings: Top your warm brownie with a scoop of vanilla ice cream, a dollop of whipped cream, or drizzle with chocolate or caramel sauce. My favorite combo? A warm mug brownie with melting vanilla ice cream—pure heaven.
- Enjoy immediately: This brownie is best enjoyed warm, straight from the mug. Grab a spoon and dig in!
Substitutions & Additions
One of the things I love about this recipe is how flexible it is. Feel free to tweak it to suit your pantry or taste buds.
- Milk swaps: Use almond milk, oat milk, or even coconut milk for a dairy-free version.
- Oil alternatives: Melted butter adds richness if you prefer it over vegetable oil.
- Sweetener options: Swap brown sugar for coconut sugar or maple syrup—though with syrup, reduce the milk slightly to keep the batter’s consistency.
- Extra mix-ins: Try adding chopped nuts, mini marshmallows, or peanut butter chips for a fun twist.
- Flavor boosts: A pinch of cinnamon or espresso powder can deepen the chocolate flavor beautifully.
- For a fun variation: If you love red velvet brownies, check out this delicious Red Velvet Brownies Recipe that’s equally easy and decadent.
Tips for Success
Here are some of my favorite tips to make sure your mug brownie turns out perfect every time:
- Use a large enough mug: The batter will rise during cooking, so give it room to expand to avoid overflow.
- Don’t overmix: Stir just enough to combine. Overmixing can make the brownie dense.
- Microwave power varies: Microwaves differ, so start with 60 seconds and add 5-second increments as needed to avoid overcooking.
- Resting time is important: Let the brownie cool slightly before eating—this helps it set perfectly and prevents burning your tongue!
- Prep ahead idea: Mix your dry ingredients in advance and store them in a small jar or container. When craving brownie, just add wet ingredients and microwave!
How to Store Homemade Brownie in a Mug
Because this brownie is meant to be enjoyed warm and fresh, it’s best eaten right away. However, if you have leftovers (or want to make ahead), here’s how to store it properly:
- Refrigerate: Cover the mug tightly with plastic wrap or a lid and refrigerate for up to 2 days.
- Reheat: Warm it back up in the microwave for about 20-30 seconds before serving to regain that soft, gooey texture.
- Freezing: I don’t recommend freezing mug brownies since the texture can suffer, but if you must, wrap tightly and thaw in the fridge before reheating.
For more cozy and easy dessert ideas that hit the spot, you might enjoy browsing recipes like these Easy S’more Bars or these delightful Red Velvet Brownies for your next sweet craving.
FAQs
Can I use gluten-free flour for this recipe?
Absolutely! Just swap the all-purpose flour for a gluten-free blend that’s designed for baking. The texture might be slightly different, but it will still be delicious.
What if I don’t have a microwave?
You can bake this brownie in a small oven-safe ramekin at 350°F (175°C) for about 12-15 minutes. Keep an eye on it to avoid overbaking.
Can I make this vegan?
Yes! Use a plant-based milk like almond or soy, and swap the oil for melted coconut oil. Just make sure your chocolate chips are dairy-free as well.
How do I know when the brownie is done?
Look for a set edge and a center that still jiggles slightly. It will continue cooking as it rests. Overcooking makes it dry, so err on the side of slightly underdone.
If you love simple, quick desserts and easy comfort food, you’ll find so many inspiring recipes at Navy at Home. Their take on comforting dishes like French Onion Soup Pasta is just as cozy and perfect for chilly nights.
Now that you’re armed with this quick and easy homemade brownie in a mug recipe, you have a go-to chocolate fix anytime you need a little pick-me-up. Whether it’s a midnight snack, an after-dinner treat, or a quick dessert to brighten your day, this recipe will never disappoint. Happy mug baking!
For even more creative kitchen inspiration and delicious recipes, don’t forget to follow us on Pinterest!
Homemade Brownie in a Mug
Ingredients
Equipment
Method
- Step 1: In a microwave-safe mug (at least 12 oz), whisk together the flour, sifted cocoa powder, brown sugar, salt, and baking powder until evenly combined.
- Step 2: Add milk, oil, and vanilla extract to the mug. Stir thoroughly until the batter is smooth and thick but pourable.
- Step 3: Fold in the chocolate chips, reserving a few to sprinkle on top if desired.
- Step 4: Microwave on high for 60 seconds. Check the brownie; edges should be set with a slight jiggle in the center. If too wet, microwave in 5-second bursts until just set.
- Step 5: Let the brownie rest for 3–4 minutes to finish cooking and develop a gooey texture.
- Step 6: Add your favorite toppings like vanilla ice cream, whipped cream, or sauces. Serve immediately and enjoy warm.